Showing posts with label netbeans. Show all posts

Sunday, December 21, 2014

Debugging ScalaTest tests in NetBeans with the Maven ScalaTest Plugin

In the spirit of creating blog posts whenever there is something important that I've figured out and I should not lose or forget, here I go.

A month or two ago, we moved all of our Java tests at Apprenda to run using the Maven Scalatest plugin . We have been using ScalaTest from day one; however, for a while there we were using SureFire + @RunWith + JUnitRunner annotations to kick off the tests. However, since IntelliJ was quite happy to run ScalaTest tests without anything else (e.g. like the @RunWith and JUnitRunner annotations), we would sometimes end up in a situation where we have some tests that are created during development in the IDE; however, when the build is run using just plain Maven, it would skip over these tests.

So, the as described in the ScalaTest documentation on working w/ the plugin , you first disable the surefire plugin, and then add the ScalaTest Maven plugin to run the tests. That all worked great, and now all of our tests run, regardless of whether we remembered to add the @RunWith annotation.

That presented a problem for me : when we were running the tests with SureFire, NetBeans was more than happy to run and debug the tests. However, when we switched to the Maven ScalaTest plugin - no such luck .. what do to ? I'm totally fine with not seeing the graphical test runner results that NetBeans shows w/ JUnit Tests ; however, where it becomes a problem is when I can't run or debug the individual tests from the IDE. The tests run just fine when you "Test" the whole project (e.g. right click on the project and choose "Test" from the context menu), but if you try to run an individual test (e.g. right click on a test case and choose Test from the context menu), or when you're inside the test case go to the Run -> Test File menu you're out of luck, nothing shows up.

So, getting the single test to run from NetBeans turns out to be pretty simple :
1. In the Project Properties -> Actions panel, choose the "Test File" action, change the properties from "test=${packageClassName}" to "suites=${packageClassName}" . As indicated in the ScalaTest documentation, the way to tell ScalaTest what test to run is using the suites system property, e.g. :


So, that's great, but how do you debug the test ? Looking at the ScalaTest documentation I was a bit confused on how to do this, as there were a few options related to debugging, but which ones to set in order to get this from NetBeans, it wasn't entirely clear.

It turns out the fix was fairly simple :
1. Since by default NetBeans runs surefire:test to run individual tests, the goal that is run needed to be switched to just "test" - this allows the Maven Scalatest plugin to run (as it binds to the test phase and does nothing for surefire:test)
2. I had to add  a couple of additional system properties that ScalaTest needs in order to run the right test, turn on debugging, and connect the NetBeans debugger and the ScalaTest test that is running.

#This teslls scalatest to run the test with this class
suites=${packageClassName}

#These tell ScalaTest to start the new process with debugging enabled
logForkedProcessCommand=true
debugForkedProcess=true
debugArgLine=-Xdebug -Xrunjdwp:transport=dt_socket,server=n,address=${jpda.address}

# This tells netbeans to fire up the debugger and wait for a connection
jpda.listen=true

Here's an example of what it looks like :


Tada - enjoy being able to run and debug individual ScalaTest tests right from NetBeans !


Sunday, April 03, 2011

NetBeans Database Explorer API and databases in NetBeans

At the recent NetBeans Platform Certified Training organized by Visitrend we were discussing how to work w/ the built in database functionality. NetBeans ships w/ a pretty decent database/SQL functionality out of the box - you can connect to any JDBC compliant database, add your drivers, sling queries, edit the results. It even has code completion for SQL queries - up until SQL Server 2005 it even provided better support for SQL code authoring than the built in Management tools ( and it is still better than the standard Mysql console).


Now, it turns out that for data driven applications, it is a pretty common occurrence that the users need to connect to a database. Sometimes it makes sense to hide the details of the database; at the same time, when you're dealing with sophisticated that have intimate knowledge of the underlying database schema and need to be able to deal with the underlying data, hiding the fact that they're dealing with a database just doesn't make sense. In our case, we have a team of QA Engineers who need to be able to look into all aspects of the database behind the application, so the best a tool can do is to make the setup and access to the database as easy and transparent as possible.

Thus, to solve this problem, my users need the following :
1. Make sure that the IDE has the proper drivers set up to access our test databases
2. Easy setup of the database connection with the details for a specific project/system under tes

Automatically setting up JDBC driver

Unfortunately, Microsoft's SQL Server is not one of the JDBC drivers that ships with the IDE. A new user could just navigate to the "Drivers" node in the "Services" top component and walk through the wizard to register a new driver. This can certainly be an extra step in the list of "setup instructions". But, why should a user have to remember to do that if we can do it in a module. Thus, the first hurdle we need to overcome is have a module that automatically registers the JDBC driver in the IDE :

1. First, we need to  provide the MSSQL JDBC driver.

For that, I created a new Library Wrapper module. I wanted to mention this because for whatever reason when I tried providing the JDBC driver and the XML registration below in the same module, it failed to find the JDBC driver.


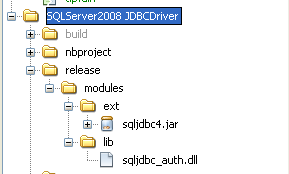
In the general case for a pure JDBC driver, this should be enough. However, in order to support windows authentication, the JDBC driver needs to have a   dll included on the path. In order to sutpport jars that need native libraries, the native library needs to be placed in the release/modules/lib as indicated on Modules API Javadoc


2. Create a second module for the actual driver registration.

Add an XML descriptor for registering new drivers (named SQLServer2008Driver.xml). For MSSQL it looks like this :


<?xml version='1.0'?>
<!DOCTYPE driver PUBLIC '-//NetBeans//DTD JDBC Driver 1.1//EN' 'http://www.netbeans.org/dtds/jdbc-driver-1_1.dtd'>
<driver>
  <name value='SQLServer2008'/>
  <display-name value='Microsoft SQL Server 2008'/>
  <class value='com.microsoft.sqlserver.jdbc.SQLServerDriver'/>
  <urls>
      <url value="nbinst:/modules/ext/sqljdbc4.jar"/>
  </urls>
</driver>


I am not entirely sure of the meaning of the nbinst: prefix, but this works.

3. Add an entry into the layer.xml file of the second module to add the driver registration XML : 


Unfortunately, in the case of the MSSQL JDBC driver just adding the dll into the module doesn't cut it as it appears that the SQL Server driver also depends on other DLLs, so it actually needs to be in c:\windows\system32 . Thus, adding the jdbc driver dll would have been not needed, as the dll needs to be copied to windows\system32 directory. To do that, register a module installer  :


public class MssqlDriverInstaller extends ModuleInstall {

    @Override
    public void restored() {
        File mssqlJdbcDll = new File(System.getenv("windir"), "system32\\sqljdbc_auth.dll");
        boolean foundDll = mssqlJdbcDll.exists();
        
        if (!foundDll) {
            FileOutputStream system32MssqlDll = null;
            InputStream bundledDll = null;
            try {
                system32MssqlDll = new FileOutputStream(mssqlJdbcDll);
                bundledDll = MssqlDriverInstaller.class.getResourceAsStream("sqljdbc_auth.dll");
                System.out.println("Copying sqljdbc_auth.dll to windows system32");
                FileUtil.copy(bundledDll, system32MssqlDll);

            } catch (IOException ex) {
                Logger.getLogger(MssqlDriverInstaller.class.getName()).log(Level.SEVERE, null, ex);
            } finally {
                try {
                    system32MssqlDll.close();
                } catch (IOException ex) {
                    Logger.getLogger(MssqlDriverInstaller.class.getName()).log(Level.SEVERE, null, ex);
                }
                try {
                    bundledDll.close();
                } catch (IOException ex) {
                    Logger.getLogger(MssqlDriverInstaller.class.getName()).log(Level.SEVERE, null, ex);
                }
            }
        }
    }
}


Automatically connecting to the database


Now, the last step is, how to automate the creation of the database connection node now that we can now be sure that the IDE has the right driver to connect to the database: (the APIs used below are from the Database Explorer API, org.netbeans.api.db.explorer)  


public void createProjectConnection(DatabaseConfig dbc) {

        DatabaseConfig dbConfig = dbc;
        if (dbConfig == null) {
            dbConfig = DatabaseConfig.getDefault();
        }

        JDBCDriver sqlSrvDrv = findSqlServerDriver();

        if (sqlSrvDrv != null) {
            try {
                DatabaseConnection dbConn = createDbConnection(dbConfig, sqlSrvDrv);

                final ConnectionManager connMgr = ConnectionManager.getDefault();
                DatabaseConnection foundConn = findSameConnection(dbConn);
                if (foundConn == null) {
                    foundConn = dbConn;
                    connMgr.addConnection(dbConn);
                }

                final DatabaseConnection dbConn2 = foundConn;
                RequestProcessor.getDefault().post(new Runnable() {

                    @Override
                    public void run() {
                        try {
                            connMgr.connect(dbConn2);
                            connMgr.selectConnectionInExplorer(dbConn2);
                        } catch (DatabaseException ex) {
                            Logger.getLogger(Ats3ProjectDataService.class.getName()).log(Level.SEVERE, "Failed to connect to database", ex);
                        }
                    }
                });

            } catch (DatabaseException ex) {
                Logger.getLogger(Ats3ProjectDataService.class.getName()).log(Level.SEVERE, "Failed to connect to database", ex);
            }
        }
    }

    private DatabaseConnection createDbConnection(DatabaseConfig dbConfig, JDBCDriver sqlSrvDrv) {
        DatabaseConnection dbConn;
        String url = null;
        String userDb = dbConfig.getName();
        if (userDb != null) {
            if (userDb.contains("${username}")) {
                userDb = userDb.replace("${username}", System.getProperty("user.name"));
            }
        } else {
            userDb = System.getProperty("user.name") + "_sb_rc";
        }
        if (!dbConfig.getUseSqlAuth()) {
            url = String.format("jdbc:sqlserver://%s:1433;databaseName=%s;integratedSecurity=true", dbConfig.getServer(), userDb);
            dbConn = DatabaseConnection.create(sqlSrvDrv, url, "", "dbo", "", true);
        } else {
            url = String.format("jdbc:sqlserver://%s:1433;databaseName=%s", dbConfig.getServer(), userDb);
            dbConn = DatabaseConnection.create(sqlSrvDrv, url, dbConfig.getUser(), "dbo", dbConfig.getPassword(), true);
        }
        return dbConn;
    }

    private JDBCDriver findSqlServerDriver() {
        JDBCDriver sqlSrvDrv = null;
        JDBCDriver[] drivers = JDBCDriverManager.getDefault().getDrivers("com.microsoft.sqlserver.jdbc.SQLServerDriver");
        // we know that there should be at least one as this module registers it
        for (JDBCDriver drv : drivers) {
            if ("SQLServer2008".equals(drv.getName())) {
                sqlSrvDrv = drv;
            }
        }
        return sqlSrvDrv;
    }

    private DatabaseConnection findSameConnection(DatabaseConnection dbConn) {
        DatabaseConnection foundConn = null;
        ConnectionManager connMgr = ConnectionManager.getDefault();
        for (DatabaseConnection dbc : connMgr.getConnections()) {
            if (dbc.getDatabaseURL().equals(dbConn.getDatabaseURL())) {
                foundConn = dbc;
            }
        }

        return foundConn;
    } 

Tuesday, June 02, 2009

Quickly running a single Grails test in NetBeans

One thing in the current NetBeans Grails project is that out of the box, you can run all tests in the project from the project's context menu but you can't run individual tests. While that is all good and well when you only have a few tests, once the tests are piling up (or you just are interested in how a particular test works), it is much preferable to be able to execute a single test at a time.


There is an existing issue to address this (so, go and vote for the issue if it seems useful, would ya?), but in the meantime, you still need to run your individual tests, right ? So, what should you do ?


The trick is to just use the "Run Grails Command" feature in NetBeans and make it easily accessible so that you can run the test in a heartbeat.

Here's what the feature looks like:


  • Right click on the project and select the "Run Grails Command..." option


  • In the dialog, type "test-app" in the Filter text box, and then type in "TestName -unit" for unit tests, or "TestName -integration" for integration tests. Note that here "TestName" is the test class name minus the "Tests" suffix for unit tests and minus the "IntegrationTests" for integration tests.


The good news is that NetBeans remembers the command options from the previous run (not the command though) and if you pull up the dialog you just have to type "test-app" and hit enter and it will execute your previous test class.


Thus, the only thing you have left it to make it easy to call the "Execute Grails Command" - so, we just need to map a shortcut. In order to do that, go to Tools->Options->Key Map tab. In the "Search" box, type "grails", the "Execute Grails Command" action is there, click in the Shortcut column, type in your shortcut (I picked Ctrl+Alt-C) and hit OK.


Now, running your test the first time involves Ctrl-Alt-C, type "test-app", tab, type "FooBar -unit" and hitting enter. Kicking it off subsequently is Ctrl-Alt-C, type "test-app", hit enter and your tests are running !!!

BEAUTY !!!

Wednesday, May 13, 2009

RAD w/ Tapestry 5, NetBeans 6.7, Maven, and Jetty : Really !!!

One of the major upsides of using Tapestry 5 is the much touted live class and template reloading. Up until recently, if you followed my previous post on working with Tapestry 5 and NetBeans, you probably ended w/ a workable solution, but still not ideal , as the live template and class reloading wasn't exactly working as expected. As a result, whenever you wanted to see the changes that you made in the live app (after running mvn jetty:run) you had to do the following:


mvn compile resources:resources
.........
-----------
[INFO] BUILD SUCCESSFUL
[INFO] ------------------------------------------------------------------------
[INFO] Total time: 18 seconds
[INFO] Finished at: Wed May 13 03:16:32 EDT 2009
[INFO] Final Memory: 16M/71M


The issue here was that NetBeans (in 6.1 and prior) did not support CopyOnSave or CompileOnSave properly in Maven projects (it did for NetBeans native projects, so if you had set up a NetBeans native project w/ explicit jar dependencies, etc it would work fine). The effect of running the above command was to compile your changes, and copy the compiled classes and modified resources into your <outputDirectory> (typically target/classes) . So, the 18 seconds above are not exactly something to lose sleep over, but it's still not the same like having the immediate Grails(or Rails)-like immediate feedback loop (that is, "Ctrl-S->Alt-Tab to browser->F5", which is "Save->Switch to Browser->Refresh").

In any case, help is on the way.


In the most recent version of NetBeans (in the 6.7 daily builds ), the issues w/ CopyOnSave support has been fixed (well, almost fixed, see the NetBeans IssuZilla issue), and now it transparently copies your modified resource files to target/[app-name]/WEB-INF/classes. Thus, with just a minor tweak, you can accomplish a Tapestry 5 Nirvana.


  1. First, set up a new Maven project by File->New Project->Select Maven project type. Follow my previous instructions on creating the actual project. Just a side note, for some reason the latest production T5 version (5.1) doesn't show up on the list of available archetypes in NetBeans.


  2. Running the app is easy, the default project comes w/ the Jetty plugin set up, so you can just run "mvn jetty:run" on the console.


  3. Alternatively, map a custom Maven goal in NetBeans by right clicking on the project, going to Custom-Goals and mapping jetty:run . See the screenshots for some extra help


  4. The default project setup comes with an Index page living in the web app context. Now that you ran Jetty, you should be able to just make changes to the template, and see them immediately. The secret here is that Jetty runs by default out of src/main/webapp, so T5 picks up the changes out of the box, no additional support by the IDE is needed.

    The problem here is that if you tried making changes to your page class (e.g. Index.java), they're not being picked up. Jetty runs from the classes in target/classes. The idea here is that we want to IDE to autocompile the changes, drop them into target/classes and have T5 pick up the new page classes. As mentioned at the beginning of the post, if you just ran the maven build again (e.g. mvn compiler:compile), but we need something better.

    OK, so, go to the project properties, go to the Build-Compile section. In the panel, select from the "Compile on Save" (COS) dropdown the "for both application and test execution".


    The trick to remember here is that this only works for "supported servers" (e.g. I know that at least Tomcat and Glassfish are in that list) where the IDE would compile the new classes, and re-deploy them on the server. Jetty is not one of these supported servers, and in order for the Compile-on-save goodness to work, the IDE needs to know you ran the app so that it can activate COS. Now, although you probably don't want to run the app in Tomcat , go ahead and run the app, select to run it in Tomcat. Now that you ran the app in Tomcat, NetBeans activated COS for this app, and now if you make new changes to your Index.java, NetBeans copies out the compiled classes to target/classes, and Jetty picks up the changes. After you run the app, you can just stop Tomcat (and the COS feature will continue working).


  5. This is pretty close to perfect. Trouble is, if you have any page templates under src/main/resources, you're still out of luck, as the resources don't get copied out into target/classes after you do the initial jetty:run. But don't despair, there is just one more step that will get us there.


  6. Add the following to your pom.xml


    <outputDirectory>${project.build.directory}/${project.build.finalName}/WEB-INF/classes</outputDirectory>


Now, this is a bit of a hack. Basically, we're telling maven to use the target/[app-name]/WEB-INF/classes to do the initial and any subsequent builds, which is where both the classes from src/main (and whereever else) and src/main/resources end up. The trick here is that this is the same directory that "mvn package" uses, and it is also the same directory that NetBeans uses for the Compile-on-save functionality. Basically, when you make changes to your page template sin src/main/resources (and after you've run your app in Tomcat once), NetBeans continues to compile the classes and copy the modified resources from src/main/resources and drop them into the target/[app-name]/WEB-INF/classes.


Considering that this is indeed a a hack, I filed a patch for NetBeans to properly support this T5 setup in Maven project. However, what got into 6.7 is only the fix to properly copy resources into target/[app-name]/WEB-INF/classes (and not in target/classes). The develoeper on the issue has some other ideas on how this should go, hopefully the full fix will go into the NetBeans version after 6.7. In the meantime, either use this little hack, or I'll probably try to repackage my fix as a standalone plugin to support this out of the box.

Wednesday, May 06, 2009

Converting legacy Rails apps to Grails : The Views

Alrighty, we're getting close to the finish line here. So far, we've covered General Project Setup, Migrating the Domain, Migrating the Controllers, and now we'll talk about migrating the views. After that, if I have a little bit of life left in me, I'll briefly speak about replacing the existing plugins in the Rails app w/ equivalent Grails plugin, and that should be the end of this series.

Now, on to the content.

  1. General Setup

  2. Layouts

  3. Page-by-page migration

  4. Tags

  5. Conclusion


1. General Setup


As you're probably used to it by now, the Grails and the Rails app have very similar approaches to storing views and templates. As you can see on the screenshots, the Rails views are in the "Views" project node, whereas in the Grails project, they're located in the "View and Layouts" project node. Inside of this folder, the views are partitioned by controller, e.g. the views and templates for controller "FooController" in the Grails app, sit inside of the view/foo subfolder.


2. Layouts

Another interesting folder in both Rails and Grails is the Layouts folder (in Grails, Views and Layouts - layouts project folder). There, the projects store the differet project layouts. The general idea here is mostly the same: different parts of the app will have different layout needs. Migrating the layouts from Rails to Grails involves mostly tag-for-tag conversion of the rhtml to gsp. A couple of useful facts about that process.

1. As mentioned in the previous post, both frameworks have a reasonable set of defaults for the layout selection. I can't quite remember all the details about how Rails chooses its defaults, but the converted application mostly specified on a per-controller basis by specifying the element, e.g. :


class FooController
layout "internal"
end

This Rails snippet will use the views/layouts/internal.rhtml layout.

There is no direct equivalent for specifying the desired layout inside of a controller in Grails. Instead, a user can add a layout with the same name as the controller (e.g. layouts/foo.gsp for FooController). Although I don't recall this being used in the Rails app, Grails also provides the ability to specify a template to use for rendering a view by specifying a <meta name="layout" content="landing"></meta>. Rendering a view that specifies the layout in this way will use the view/layouts/internal.gsp layout.

2. Converting the Rails layouts
The Rails layouts that I worked with used the following statements in the <head> element:


<head>
<%= stylesheet_link_merged :base %>
<%= stylesheet_link_merged :print, 'media' => 'print' %>

<%= javascript_include_merged :base %>
<%= javascript_include_merged :application %>
</head>


I can't quite say I know what all of the above statements do. I inspected the output the actual HTML output and replaced it with the following in my Grails template:


<head>
<link rel="shortcut icon" href="${createLinkTo(dir:'images',file:'favicon.ico')}" type="image/x-icon" />
<link rel="stylesheet" href="${createLinkTo(dir:'stylesheets/active_scaffold',file:'stylesheet.css')}" media="screen" type="text/css" />
<link href="${createLinkTo(dir:'stylesheets',file:'styles.css')}" media="screen" rel="Stylesheet" type="text/css" />
<link href="${createLinkTo(dir:'stylesheets',file:'print.css')}" media="print" rel="Stylesheet" type="text/css" />
<link href="${createLinkTo(dir:'stylesheets/active_scaffold/default',file:'stylesheet.css')}" media="screen" rel="Stylesheet" type="text/css" />
<!--[if IE]>
<link href="${createLinkTo(dir:'stylesheets/active_scaffold/default',file:'stylesheet-ie.css')}" media="screen" rel="Stylesheet" type="text/css" />
<![endif]-->
<g:layoutHead />
<g:javascript library="application" />
<g:javascript library="prototype" />
<g:javascript library="scriptaculous" />
</head>


A couple of things to note here :
* Using the ${createLinkTo()} tag inside of the stylesheet links : it is very convenient and makes the generation of the links pretty foolproof.
* Using the <g:layoutHead /> statement : allows the inclusion of any elements from the <head> element of the "client" page (the page that is using the layout).

Inside of the body of the template, the Rails template use the <%= yield%> statement to include the body of the client page. The equivalent statement in the Grails layout is the <g:layoutBody>

Finally, Rails allows client views to contribute "additional" content into the final output. In other words, the template can define an "area" where the client template can contribute markup, in a way that the said markup shows up in the parts of the layout that are generally rendered by the template. For example, if the client pages need to contribute markup to the content of the "sidebar", then, the layout would use something like the following:

<% if !@content_for_sidebar.nil? %>
<div id="right_sidebar_content_main">
<%= yield(:sidebar) %>
</div>
<% end %>


The client template, contributes to the layout as follows:

<% content_for :sidebar do%>
<div> This content will show up under the 'right_sidear_content_main' section in the final output </div>
<% end %>


In Grails, in order to implement the same feature, we have to resort to a less used and somewhat obscure feature of the underlying templating system that Grails users : Sitemesh. Here's the equivalent in the Grails project:

<g:if test="${pageProperty(name:'page.sidebar')!=null && pageProperty(name:'page.sidebar')!=''}">
<div id="right_sidebar_content_main">
<g:pageProperty name="page.sidebar" />
</div>
</g:if>


Now, in the "client" page, add content to the sidebar as follows:

<content tag="sidebar">
<g:render template="course_notes_side_bar" />
</content>

There is some additional info on using this feature in the Grails docs' for pageProperty tag, but more so in the Sitemesh user docs and just random blogs


3. Page-by-page migration
There is in most cases a 1-1 relationship between the views in both frameworks. Converting from the Rails views to the Grails views was mostly mechanical : see the Rails tag, find the equivalent Grails tag, and then figure out how to map the Rails tag attributes to the Grails tag attributes. In most cases, the two are similar enough and the conversion is fairly easy. At other times, Rails did provide some more features not present in Grails and migrating the pages did require some level of thought and effort. Even in that case, even for the tags that don't have a Grails equivalent, after the first couple of tags the conversion is always the same. Here's an example of an easy conversion:

In Rails:

<%= link_to_remote "Upload File",
{:url => { :controller => 'activity_items', :action => 'show_upload_form', :activity_id => @act_id},
:before => "Element.show('show_upload_form')" ,
:success => "Element.hide('show_upload_form');",
:update => { :success => "upload_form", :failure => "upload_form_errors" }},
{:class => "action", :title =>"Add a new file."} %>


In Grails:

<g:remoteLink controller='activityItems' action='show_upload_form'
params="[act_id:act_id]"
before="Element.show('show_upload_form')"
onSuccess="Element.hide('show_upload_form')"
update="[success:'upload_form', failure:'upload_form_errors']"
class="action" title="Add a new file"> Upload File </g:remoteLink>


Here's another one.

Rails:

<%= form_remote_tag :url => {:action => 'update',:controller => "activities", :id => @activity.id},
:before => "Element.show('form-indicator-activities')" ,
:success => "Element.hide('form-indicator-activities')" %>


Grails:

<g:formRemote url="[action:'update', controller:'activities', id:activity.id]" name="editActivityForm"
before="Element.show('form-indicator-activities')"
onSuccess="Element.hide('form-indicator-activities')">


I found that because the Rails app assumed to be deployed at the root of the context (e.g. http://localhost:3000/), whereas the Grails app always assumes that it will be deployed to a non-root context path (e.g. /foo), in many cases I found myself replacing static image references with links created with ${createLinkTo()}

FROM:
<img src="/images/indicator.gif" id='addurl' style='display:none;' />


TO:
<img src="${createLinkTo(dir:"images",file:"indicator.gif")}" id='addurl' style='display:none;' />


Here's an example of a Rails tag that didn't have a direct equivalent in Grails.

Rails:

<%= text_field_with_auto_complete(:course, :title, {:class=>"SearchTextBox", :value => " type here, then hit enter", :onclick=>"this.value=(this.value == ' type here, then hit enter')?'':this.value;", :onblur => "this.value=(this.value == '')?' type here, then hit enter':this.value;"}, completion_options = {}) %>


In Grails, I created a template that contained the same html + javascript that the Rails tag produced:

<%-- The content below was migrated from the Rails app, could be improved if using a plugin providing a cleaner autocompletion setup --%>
Search

<style type="text/css">
div.auto_complete {
width: 350px;
background: #fff;
}
div.auto_complete ul {
border:1px solid #888;
margin:0;
padding:0;
width:100%;
list-style-type:none;
}
div.auto_complete ul li {
margin:0;
padding:3px;
}
div.auto_complete ul li.selected {
background-color: #ffb;
}
div.auto_complete ul strong.highlight {
color: #800;
margin:0;
padding:0;
}
</style>
<input autocomplete="off" class="SearchTextBox" id="course_title" name="course.title" onblur="this.value=(this.value == '')?' type here, then hit enter':this.value;" onclick="this.value=(this.value == ' type here, then hit enter')?'':this.value;" size="30" value=" type here, then hit enter" type="text">

<div style="position: absolute; left: 1275px; top: 161px; width: 230px; display: none;" class="auto_complete" id="course_title_auto_complete">
</div>


<script type="text/javascript">
//<![CDATA[
var course_title_auto_completer = new Ajax.Autocompleter('course_title', 'course_title_auto_complete', "${createLink(controller:'courses', action:'auto_complete_for_course_title')}", {})
//]]>
</script>


Finally, Rails definitely has some more advanced scaffolding features that Grails didn't support out of the box or did not have a direct equivalent. Similarly to the example above, I just used the html that the scaffold generated, stuffed that into a separate template and used that.

Rails:

<%= render :active_scaffold => "notes", :constraints => {:user_id => current_user.id, :course_id => @course.id} %>


In Grails, this became a standalone template (_notes_scaffold.gsp), which initially contained the static HTML generated by Rails, which I then rigged to support dynamically generate the needed markup (e.g. loop, etc). In the end, the call to the scaffold code above, becomes the following:

<g:render template="/notes/notes_scaffold" model="[notes:UserNote.findAllByUserAndCourse(user?:current_user(),course)]" />


4. Helpers and Tags
In a couple of instances, the Rails app depended on the "helpers" - seemingly a collection o methods that are available to be executed either from the view or contoller. I ended up encapsulating some of these common operations into taglibs, so that the usage of the said tags in grails is as follows:

Rails (a sample Helper located in the Helpers project node):


require 'bluecloth'
module ApplicationHelper
include TagsHelper
def link_to_button(label)
"<table cellpadding=0 cellspacing=0 class=button_action_link><tr><td align=right style=\"background: url('/images/left_button_curve.gif') no-repeat; width: 8px; height: 23px;\"></td><td nowarp=\"nowrap\" style=\"background: url('/images/center_button_bg.gif') repeat;\"> #{label} </td><td style=\"background: url('/images/right_button_curve.gif') no-repeat; width: 29px; height: 23px;\"></td></tr></table>"
end
end


In Grails, it becomes the following:
class CosTagLib {

def linkToButton = { attrs ->
out << "<table cellpadding=0 cellspacing=0 class=button_action_link><tr><td align=right style=\"background: url('${createLinkTo(dir:"images",file:"left_button_curve.gif")}') no-repeat; width: 8px; height: 23px;\"></td><td nowarp=\"nowrap\" style=\"background: url('${createLinkTo(dir:"images",file:"center_button_bg.gif")}') repeat;\"> ${attrs.label} </td><td style=\"background: url('${createLinkTo(dir:"images",file:"right_button_curve.gif")}') no-repeat; width: 29px; height: 23px;\"></td></tr></table>"
}
}


An alternative to adding common helper functionality in tag libraries is to add the same methods as public methods on the superclass. For example, the parent controller contains the following closure:

def current_user = {
if (this.currentUser==null && session.user) {
this.currentUser = User.get(session.user.id)
}
println "Returning currentUser ${currentUser} "
return currentUser;
}


Then, in GSPs, one can use the closure as follows:


5. Conclusion

It's interesting that the migration of views/templates is probably the least complicated part of migrating a Rails app to Grails. Yet, at the same time, together w/ migrating the controllers it was possibly the most time consuming task. Understandably, these artifacts represent ARE the web application. While there probably isn't a good way to automatically convert the controller code, the view code is much more amenable to such an automated conversion, tag-for-tag.

For a lot of these repetitive tasks of converting the app UI tag by tag ( I didn't spend the time to create an auto-converter), I ended up creating a couple of NetBeans live templates that give me parameter and code completion of attributes, jumping between different params, etc.

Tuesday, May 05, 2009

Converting legacy Rails apps to Grails : The Controllers

So, you've already looked at the previous blog posts on Setting up the Project and Migrating the Domain Objects. The whole world must be wondering "What happened to this blog post series, did people just stop migrating from Rails to Grails?". Well, I've been in Tapestry land for the last 6-7 months and haven't had much free time to finish my blogging endeavor to finish my series of articles. But, what do you know : all of a sudden the topic of migrating legacy Rails apps to Grails came back to the fore for me (work related, don't ask, it's top secret), and here I am. In a valiant effort, I will try to finish off the topic in one fell swoop (hopefully today) and bang out a couple of different articles that document in details the ups and downs of such a migration.

Because this article is on the long side, here is the Table of Contents:

  1. Overview of Controllers

  2. General language related issues.

  3. Input Processing

  4. Input Validation and Error Reporting

  5. Rendering Responses

  6. Advanced Ajaxiness : Dynamic Javascript

  7. Conclusion


1. Overview of controllers


Now, back to the meat and potatoes of this article : migrating the Rails controllers to Grails. It's no secret that Grails heavily borrowed ideas from Rails (and NO, Grails is not Groovy on Rails, there's no mass transit involved at all, it's the good ole cup that everyone wants) and as can be seen from the screenshot of the project setup, both framework keep the controllers in the Controllers NetBeans project folder. Creating Grails controllers is easy: just right click on the Controllers project folder and select "New Controller". NetBeans walks you through naming the Controller properly and creates the needed file and run the regular Grails "create-controller" task, which in creates a default view for the controller.


The structure of the controllers themselves is very similar as well : in both cases, there is a one-to-one relationship between the Rails and Grails controllers. Inside the controller, in both cases, there is a class containing a bunch of closures , methods, and private member variables. In both cases, the closures in the controller become a part of the "public api" exposed by the controller, as all closures can be called from the URL (e.g. http://localhost:8080/app/controllerName/closure -> http://localhost:8080/app/account/login). Private methods are not accessible to be invoked from the URL. For "old school" Java developers who might not be intimately familiar w/ Rails or Grails, it is interesting to note that the controllers are thread safe : that is, they can contain instance variables that will not be clobbered if two concurrent requests are sent to the same controller. A new controller instance is created for each Http request.

OK, let's see what's inside the controller. Here's an example Rails controller:


class ActivityItemsController < ApplicationController
def create
@activity_item = ActivityItem.new(params[:activity_item])
if @activity_item.save
// do whatever
else
// do whatever else
end
end
end


Converting this same controller to Grails would look like this:

class ActivityItemsController extends ApplicationController {
def activity_item;

def create = {
this.activity_item = new ActivityItem(params.activity_item)
if (activity.save()) {
// do whatever
} else {
// do whatever else
}
}
}


2. General language related issues.

A lot of things to talk about here. First of all, just looking at the code it looks almost the same. The first superficial difference is the naming convention for the classes : in Rails user underscore_separated_file_names, whereas Groovy uses CamelCase. One notable difference is that in Grails, you do need to declare the class members, whereas in Rails (due to Ruby heritage), the properties can directly be assigned to when needed (e.g. @activity_item = ....). While the Ruby approach does save one line of code to declare the property, while migrating the code I found it very helpful to see the declarations at the top of the Groovy class. When you don't declare the class members upfront, it seems that it's quite easy to create a whole bunch of properties in the Ruby class w/o realizing how many you've created, which generally can lead to muddying the interface (mind you, the said properties are publicly accessible - e.g. from views, other closures, methods, etc).

3. Input processing
The second thing to note is the existence of the "params" map in both cases. In both cases, one can both read from and write to the params map using the accepted syntax : map[:key] in Ruby and map.key or map[key] in Groovy. So, nothing particularly interesting here. A bunch of other default objects are available in the Grails controller (probably quite familiar to Java Devs) such as servletContext, session, request, params, flash. Dealing with all is mostly the same in both frameworks and should be familiar to anyone done anything on the web.

When processing input, in a number of places, Rails uses the following shortcut/idiom to bulk update the values of many attributes of an object from request parameters at once:

class Foo

def bar
@activity.update_attributes(params[:activity])
end
end

To cut the long story short, this take in the value of request parameters and binds them to values in the object (note, this has severe security implications but that's a different topic to discuss). Grails offers an equivalent statement with:

class Foo {
def activity

def bar = {
bindData(activity,params.activity)
}

}

If using the straight out bindData method from Grails it accomplishes the same thing, with the same security implications. Whenever I actually bumped into examples like this, I tried to address some of the security issues by using the "more advanced" bindData method in Grails, which allows specifying parameters to exclude and a prefix of a property to use for binding, e.g. if I only wanted to bind the customer.name and customer.phone attributes from the request and I definitely wanted to prevent the customer.id attribute being affected, I'd use something like this:

bindData(myCustomerObject,params,["id"], "customer")


4. Input Validation and Error Reporting
In both framework, a large part of validating the input that is written to the domain model is done by specifying constraints in the domain model itself (e.g. see the article about the Rails->Grails domain migration). Thus, in both frameworks, code like this is pretty common:

if @activity.save
// do whatever on success
else
flash[:error]= @activity.errors.full_messages.join("
")
end


In Grails, the code looks very similar:

if (activity.save()) {
// do whatever on success
} else {
flash.error = activity.errors
}


One minor difference here is that (at least in this app), the Rails just concatenated the error messages as text and placed them in the "error" property in flash scope. In contrast, Grails assigns the actual "errors" object to the same flash property, then allowing the view to render these error objects as it wishes (e.g. using the g:renderErrors tag), which would allow rendering an error for a particular property, etc.

In both frameworks, validation of can happen in the controller itself, and errors can be added to the relevant error property (in the appropriate scope).

One more advanced feature of Grails that I found very useful later on in the conversion are the Grails are the form beans that you can use to populate values from the request (thus shielding from the security issues referred to further up), validating the input in a domain-class style approach, and generating errors in a nice and easy manner. So, here's the form object:


public class ChangePasswordForm {
String oldPassword;
String password;
String passwordConfirmation;

static constraints = {
oldPassword(nullable:false,blank:false)
password(nullable:false, blank:false, size:4..40)
passwordConfirmation(nullable:false, blank:false, size:4..40,
validator: { oldPw, chgPwdCmd ->
if (oldPw!=chgPwdCmd.password) {
return "notsame.message"
}
}
)
}
}


You'll note the declarative syntax familiar from domain object validation, it's a beauty !!!

<g:formRemote url="[action:'change_password']" name="ChangePasswordForm"
before="Element.show('form-indicator-pwd')"
onSuccess="Element.hide('form-indicator-pwd')">

</g:formRemote>


Add the following to your grails-app/i18n/messages.properties for custom error messages:

#Custom messages
forms.ChangePasswordForm.passwordConfirmation.notsame.message=Password confirmation not the same as password
wrong.password.message.forms.ChangePasswordForm.password=Old password is wrong, please enter again
forms.ChangePasswordForm.password.blank.message={0} cannot be blank


Finally, using the form in the controller when submitted:

def change_password = { ChangePasswordForm changePasswordForm ->
if (!changePasswordForm.hasErrors()) {
// accessing the values from the form
def pwdValue = changePasswordForm.password
// adding a custom error to the form for an error not enforced in constraints
if (whateverRandomReasonYouWantToRejectAField) {
changePasswordForm.errors.rejectValue("password","wrong.password.message")
}
// do whatever
} else {
// do whatever else
}
}
}


Finally, it seemed like a pretty common idiom in the Rails app to use dynamic javascript (I will talk about that plugin later ) to render errors back to the client:

if (@activity.save)
// do whatever on success
else
flash[:error] = "#{@activity.errors.full_messages.join('
')}"
render :update do |page|
page.replace_html "errors_div", :partial => "common/errors_flash",:layout=>false
// do whatever else to the page
end
end


In essense, this takes the validation errors, renders them using the "errors_flash" template, and replaces the content of the "errors_div" in the page with the rendering result. This approach caused me a lot of grief initially, but after a little bit of work it turned into the following in my Grails app:

if (activity_item.save()) {
// do whatever on success
} else {
js_error(activity_item.errors)
}


Where the js_error method in the controller superclass, looks something like this (using the dynamic javascript plugin that will be discussed later):

def js_error = { errors ->
flash.error = errors
log.debug "Sending errors back to client: ${errors}"
renderJavascript {
update 'errors_div', [text:g.render(template:"/common/errors_flash")]
callFunction "Element.show" , 'errors_div'
}
}


5. Rendering Responses
Converting the response rendering from Rails to Grails was pretty straightforward, here's the Rails example:

def new
render :partial => "new", :layout => false
end


In Grails, this becomes:

def _new = {
render(template:"new")
}


One tricky thing to note here is that because "new" is a Groovy keyword, I could not use the same closure name, NBD. The render controller method is pretty much the best thing since sliced bread and can render a whole bunch of things like regular pages, templates, XML, or JSON. Grails uses a convention that partial pages (templates) are named starting w/ an underscore. Thus, when you do:

render(template:"fooTemplate")

Grails finds the _footemplate.gsp file and renders it (equivalent to the Rails render :partial => "footemplate" which renders _footemplate.rhtml).


One other common idiom in the Rails app was to issue redirects from the controller:

redirect_to :action => 'show', :controller => 'activities', :id=> params[:act_id]


Grails supports this idiom pretty nicely with the redicect controller method with pretty much the same parameters:

redirect(controller:'activities', action:'show', id:params.act_id)


This particular project was using both script-centered and content-centered AJAX, and not much data-centered AJAX, so I didn't get to use JSON or XML rendering much; however, I always found the automatic marshalling to JSON or XML pretty cool:

// Automatic marshalling of XML and JSON
import grails.converters.*

render Book.list(params) as JSON
render Book.get(params.id) as XML


Finally, one cool feature of Rails that I initially missed was the ability to specify the default layout per controller :

class ActivitiesController < ApplicationController
layout "internal"
end

The statement above sets the default layout for this controller in the controller itself. Grails supports specifying the layout either by convention (e.g. grails-app/views/layouts/CONTROLLER.gsp or grails-app/views/layouts/CONTROLLER/ACTION.gsp , effectively equivalent to specifying layout="internal" in the controller) or explicitly in the template by specifying a meta tag (<meta name="layout" content="internal"></meta<) in the template.

6. Advanced Ajaxiness : Dynamic Javascript
I was planning to discuss Rails plugins in a separate article; however, there is one particular Grails plugin that was extremely useful to cover a portion of Rails that Grails doesn't cover out of the box. More specifically, I'm talking about the Rails script centered AJAX w/ dynamic javascript, e.g. :

render :update do |page|
page.replace_html "errors_div", :partial => "common/errors_flash",:layout=>false
page.replace_html "show_activities", :partial=>"show", :layout=>false
end


As explained before, this replaces the content of the "errors_div" in the page w/ the rendered "errors_flash" template (which basically renders the flash errors in a list or something like that), and then replaces the content of the "show_activities" div w/ the content of the partial template.

My initial approach was to change the actual pages to process the response and update the right div w/ the returned content, but it was a big PITA, considering how much the Rails app used this. Finally, after some searching on the net, I found the Dynamic Javascript plugin. It had most of the features I needed to implement this Rails idiom with something like this:


renderJavascript {
update 'errors_div', [text:g.render(template:"/common/errors_flash")]
callFunction "Element.show" , 'errors_div'
update 'show_activities', [text:g.render(template:"show_activities")]
}


Now, in places where I needed to update multiple elements on the page, I ended up using this style of code in the controller itself. However, the majority of the uses were the following:
* Render an error div
* Replace a content div w/ the content of a template
* A combination of the two.

As a result, I moved the following code into the parent class of my controllers:

def js_error = { errors ->
flash.error = errors
log.debug "Sending errors back to client: ${errors}"
renderJavascript {
update 'errors_div', [text:g.render(template:"/common/errors_flash")]
callFunction "Element.show" , 'errors_div'
}
}

def js_render = { replaceDiv,replaceContent ->
renderJavascript {
replace replaceDiv, [text:replaceContent]
}
}

def js_error_and_replace = { errors, replaceDiv,replaceContent ->
flash.error = errors
println "Found errors ${errors}"
renderJavascript {
update 'errors_div', [text:g.render(template:"/common/errors_flash")]
callFunction "Element.show" , 'errors_div'
replace replaceDiv, replaceContent
}
}


Which significantly simplified the code in the actual controllers, e.g. :

if (this.user.authenticate(user.login, changePasswordForm.password)) {
if (this.user.save()) {
flash.notice = "Password Changed"
js_render("change_password", g.render(template:"change_password_form"))
} else {
flash.notice = "Password could not be changed"
js_error(user.errors)
}
} else {
println "Didn't authenticate w/ password"
js_error_and_replace(changePasswordForm.errors,"change_password",[text:g.render(template:"change_password_form")])
}


As mentioned above (and as expected), Grails support redirects pretty nicely. However, Javascript redirects , though not necessarily tricky, still required an extra piece of code to the parent controller:

def js_redirect = { redirectUrl ->
def jsRedirect = "document.location = \'$redirectUrl\'"
renderJavascript {
appendJavascript jsRedirect;
}
}

At which point, the code in the controller is really straightforward:

js_redirect(createLink(controller:'activities', action:'show',id:params.id))


However, one of the use cases involved a form executing in a frame (an upload form that did some status updates in a frame), which depending on the content returned in the frame, needed to redirect the whole browser window whenever the upload was done. In Rails it was handled as such:

responds_to_parent do
render :update do |page|
flash[:notice] = "File Uploaded Sucessfully"
page.redirect_to :action =>'show', :controller=>'activities', :id=>params[:activity_id]
end
end


The code in the parent controller to support this idiom is as follows:

def parent_redirect = { redirectUrl ->
render (text : "<html><body>"+
"<script type='text/javascript' charset='utf-8'>"+
"var loc = document.location;"+
"with(window.parent) {"+
" setTimeout(function() { "+
"window.eval(document.location = \'$redirectUrl\'); loc.replace('about:blank'); "+
"}, 1)"+
"}"+
"</script></body></html>")
}


One final note on the Dynamic Javascript plugin : the plugin that is uploaded on the Grails wiki is version 0.1 . The plugin appears to not be maintained actively; however, the linked author's blog (http://blog.peelmeagrape.net/2007/10/9/dynamic-javascript-plugin-for-grails) has version 0.2 of the plugin. Still, when I was heavily using this plugin, I ran into some issues with it and had to patch it as follows (in plugins/dynamic-javascript-0.2/src/groovy/JavascriptBuilder.groovy , commented out code is the broken part):

private String renderTemplate(Map options)
{
// StringWriter s = new StringWriter()
// GrailsWebRequest webRequest = (GrailsWebRequest)RequestContextHolder.currentRequestAttributes();
// HttpServletResponse response = webRequest.getCurrentResponse();
// def writer = (RoutablePrintWriter)webRequest.getOut()
return controller.g.render(options);
// writer.destination.out.toString();
}


I posted on the author's blog w/ the proposed change, and later on received a notification that he liked the change and that he would incorporate it into the plugin. However, it appears that the plugin on his page is still at version 0.2 and my comment has disappeared from the blog. Oh, well...


Conclusion
It was quite a journey so far. None of the problems in migrating controllers are particularly difficult or mind bending; however, there are just a lot of different issues to deal with if you're starting from scratch. So, now that you have all this good info, START MIGRATING THAT RAILS APP THAT YOU'VE BEEN EYEING, WOULD YA !!???!!!

Saturday, November 01, 2008

Converting legacy Rails apps to Grails : The Domain

A little story about legacies...
(skip this if you're not interested in hearing a sobbing sentimental story and just want to get to the good stuff)

First a short story about my usage of "legacy" in the title of the post. So, here it is : a few years ago, Rails explodes on the scene. Everybody around you who knows a thing or two about web apps start thinking and asking whether your next app should be in Rails instead of XXX [substitute your framework here]. Nevermind that you'll be writing an "enterprise application" that would most likely need to integrate with the rest of your infrastructure (Java, PHP, whatever), or that the said application might have some performance requirements (e.g. it actually needs to DO something, instead of just pushing a few form feelds from and to the database).

Alright, so, Ruby is cool, Ruby is all the rage. You bring in that intern that seems to be a Rails wizard, he totally blinded you with how he put together an app w/ 3-4 forms in less than an hour. Nobody on your existing team can do that : they want to "think about the problem", "understand what needs to be done", put some thought into how to do it, and only then start writing the code. Not so w/ your superstar intern : he's banging out page after page, form after form, it's glitzy and it's Ajaxy, your heart is about to melt from the love towards your unexpected intern saviour.


Fast forward to a few years later. Your intern is gone, he's onto his next new and exciting gig. Your loyal developers have learned a few tricks from the now "old and crusty" Rails app, you got the next version of your Java web framework and your devs are doing quite better with giving you the "quick forms" when you need them. Your customers, initially raving about how quickly they got their app, are now increasingly annoyed that when they ask for what is seemingly simple feature (e.g. hook into this other database that's not mysql, talk to that 'other app' that's been there for a while) and your estimates are way too high ('cause you have to write all that stuff from scratch). To make things worse, your developers actually popped the hood on the Rails app, and it's a big happy bowl of spaghetti : the controllers have their hands in everything : poking around the database, spitting back dynamic javascript groping the glitzy UI in the most unbelievable places (and btw, your devs don't want to touch it with a ten foot pole). When your company scored that big customer, everybody was enamoured by the cha-ching of the cash register, but nobody thought that all those new users will want to use your intern's app (which btw, turned out to not know much about web apps in general, as Rails was the first thing he learned), and now both new and existing customers are not so happy that it takes longer and longer for the app to service them. On top of that, there are very few people who do understand all the magic that happens under the hood in the Rails app, and there are yet fewer people who know how to scale it to the level you need.


That's the place where the phrase "Legacy Rails" really starts making sense. Sure, there are new releases that promise a little more glitz to your app, the framework is still being actively developed, and nearly everyone out there has heard of Rails by now. But now that you're in this situation, can you really put your job on the line that just this next release will have the promised silver bullet ? Or would it maybe be better to just move the game back into your home court, where you set the rules, your dev team knows the ins and outs of the technology like the back of their hand, it scales well, integrates with EVERYTHING you could imagine ? That's when you really want that little Rails locomotive to let off some steam and disappear into the distance just as quickly as it arrived.


Anyway, I digress :-) Back to what I was talking about : how do you migrate the app to Grails.


Now The Goodies

Below is a sample Rails model class that we'll use to talk about the migration:


class Activity < ActiveRecord::Base
has_many :activity_items
has_many :user_notes
belongs_to :competency_group
belongs_to :course

has_many :activity_item_assets

belongs_to :created_by, :class_name => "User", :foreign_key => "created_by"
belongs_to :updated_by, :class_name => "User", :foreign_key => "updated_by"

validates_presence_of :title, :instruction_text, :competency_group_id
validates_length_of :title, :maximum => AdminType::COURSE_TITLE_LENGTH
validates_uniqueness_of :title, :scope => [:competency_group_id]

end


And the equivalent Grails domain object:


class Activity {

String title, instructionText
Date createdAt, updatedAt


static hasMany = [activityItems : ActivityItem, userNotes : UserNote, activityItemAssets:ActivityItemAsset]
static belongsTo = [competencyGroup:CompetencyGroup, course : Course, createdBy : User, updatedBy : User]

static constraints = {
title(nullable:false,blank:false,size:1..AdminType.COURSE_TITLE_LENGTH,unique:['competencyGroup'])
instructionText(nullable:false, blank:false)
createdAt(nullable:true)
updatedAt(nullable:true)
}

static mapping = {
table 'activities'
createdBy column:'created_by'
updatedBy column:'updated_by'
version false
}

}


1. Location

Both Rails and Grails have a specific place where you can keep your domain objects. In Rails, you keep it in the app/models directory (the Models directory in your NetBeans project), whereas in Grails it's in grails-app/domain directory (the Domain Classes folder in the NetBeans project).

2. Purpose

In both cases, the purpose of the domain objects represent the most important concepts in your application. Additionally, they typically are "persistence capable" (e.g. you can persist an instance w/ a single call), and they provide for a fairly simple specification of relationships w/ other domain objects, as well as allow for specifying validation rules.


NetBeans provides fairly basic support for creating the domain objects : you get a little wizard that asks for the name of the domain object and it creates the Groovy class for you. One of the cool things about how NetBeans handles Grails is that it doesn't create any new metadata (e.g. there's no project directory created), and because the NetBeans project system is based on Ant, the NetBeans project simply delegates the creation of the domain class to the Grails Ant scripts.

Note that when you're looking at the differences between the Grails and the Rails classes, you will notice that (by design), the Grails class is much more focused on the domain, whereas the Rails class is much closer to the database. Thus, for example, you will notice that in the last line of the Rails validation, it references the "competency_group_id". I would imagine this is where my lack of knowledge of the Rails CoC (convention over configuration) bit me in the back, but in a number of places (that I'll mention), the Rails code is allowed to reference "assumed" column names (based on the CoC), which is generally confusing, and also seems to be very refactoring unfriendly (e.g. what if at some point in life, I needed to have a slightly different colum name - would I have to hunt down all references to that column)???

3. Class properties & Relationships


class Activity {

String title, instructionText
Date createdAt, updatedAt


static hasMany = [activityItems : ActivityItem, userNotes : UserNote, activityItemAssets:ActivityItemAsset]
static belongsTo = [competencyGroup:CompetencyGroup, course : Course, createdBy : User, updatedBy : User]

}


Migrating the class properties & relationships is pretty straightforward. For each "simple" property in the Rails class, you can declare a corresponding one in the Groovy class. Declaring the equivalent relationships in the Grails class is also quite straightforward, as the relationship names are pretty much the same. Although there is nothing in Groovy that prevents you from using the Rails naming conventions for properties (e.g. user_name), the Groovy convention is very much like in Java - CamelCase.

This is probably due to my Java background, but I found the ability to declare a class member variable anywhere in the Ruby class much less readable than the equivalent Groovy class. What I mean is that, in the example above, the ":title" property is not mentioned anywhere before the validation constraint. Thus, in order to figure out the properties, you need to examine not only the relationships but also all validation constraints. Although in the Groovy class, the declaration of the relationships similarly defines properties in the class, but at least in validation, mapping, etc. you definitely need to refer to properties that are declared somewhere. I guess this probably comes down to preference, but in my opinion, looking at the Grails class, I can see all the available properties at a glance.

In a very similar manner, I find that even the relationship declarations are very much more readable in Grails. One glance, and I can recognize all relationship types (e.g. one to one, many-to-one, whatever) and the properties corresponding to those relationships. In contrast, although the same can be accomplished in the Rails declarations (e.g. if you specify all has_one mentions one after another), not all Rails model classes that I had to look at followed such a convention.

4. Validation

static constraints = {
title(nullable:false,blank:false,size:1..AdminType.COURSE_TITLE_LENGTH,unique:['competencyGroup'])
instructionText(nullable:false, blank:false)
createdAt(nullable:true)
updatedAt(nullable:true)
}

Once again, migrating the Rails validations is pretty straightforward, although not all Rails validations had a 1:1 translation in Grails. This is where the validation section of the Grails manual came in very handy, expecially during the first steps in the conversion when I wasn't really sure how to convert from one constraint in Rails to its Grails counterpart.

One thing to notice that is subtle but different between the Grails and Rails validations. In Grails, if a class property is not explicitly declared as "nullable", it is by default required. On quite a few occasions during the conversion, after initially migrating the explicit Rails constraints, I found myself going back to the domain class in order to make some of the Grails domain class fields optional.

One final point on validation is the title uniqueness constraint. In Rails it looks like :

validates_uniqueness_of :title, :scope => [:competency_group_id]


And in Grails it is :

title(nullable:false,blank:false,size:1..AdminType.COURSE_TITLE_LENGTH,unique:['competencyGroup'])


The thing to notice here is that Rails directly goes to the colum name, whereas Grails just uses the property name declared in the class.

Once again, I find the Grails validation section much more readable, as all constraints are organized in one section, and they're organized around the concepts that a user cares about. Thus, when I'm thinking about the validations that apply to a title, I can specify all constraints in the title constraints, compared to the Rails style, where the declarations are focused around the constraints (e.g. when you are thinking about a concept in the domain, do you think "Hm, let me figure out which properties of this class might need a format constraint?", or do you think "Hm, let me see, a title, what kind of constraints might it need, maybe a format constraint?"

5. Mapping into the database


static mapping = {
table 'activities'
createdBy column:'created_by'
updatedBy column:'updated_by'
version false
}


As you see in the "mapping" section of the Grails class, there were a few attributes that needed to mapped explicitly. The reason I had to do this is that at least during the initial migration, it was preferable that the Rails and Grails app work off the same database schema, so that the two apps can be tested side-by-side on the same data.

The mapping of the Grails app into the Rails database was pretty straightforward, as they follow very similar naming conventions for naming the database columns. First, Rails has the habit of converting the domain class names to plural for the table names, thus I had to add the mapping in the Grails app to point to the same tables. Additionally, the Rails class explicitly stated that the foreign keys that connect the user and activity are "created_by" and "updated_by", whereas the default Grails naming convention for the foreign keys would have been "created_by_id" and "updated_by_id", hence the additional mapping.

You will additionally notice the explicit disabling of the "version" column in the Grails class. The issue here is that by default, Grails uses a "version" column in order to allow Hibernate to do optimistic locking in transactions. Note that removing the version column from the Grails app has its penalties; however, at least in the initial implementation it was more important to have the same database schema, than to focus on performance. Although initially (before disabling the column) Grails very gracefully handled the addition of the new "version" column to the database, it became an issue when the column was added on a populated database, and the version would receive a null default value. Thus, had I decided to keep it for each table, I would have had to update the version column manually to contain 0 (so that Grails could increment as necessary, otherwise a NPE came up when Grails pulled a null from the database).

It is recommended that such a version column is restored after the initial migration period in order to allow Hibernate to make use of its optimistic locking performance optimizations.

6. Non persistent attributes
By default, all attributes defined in the class are persisted in the database. Now, in the example of the User class below, the cleartext password really shouldn't be persisted. Rails gets around it by declaring it as a virtual attribute:

class User < ActiveRecord::Base
# Virtual attribute for the unencrypted password
attr_accessor :password

end


The Grails domain class takes a slightly different approach, where the field is still declared, but is also mentioned in a special class attribute to indicate to Grails that the field shouldn't be persisted , and the 'password false' in the mapping section to indicate that a column shouldn't be created in the database.


class User {
static mapping = {
table 'users'
password false
}

static transients = [ "password"]

}


7. Persistence events

class Foo {
def beforeInsert = {
makeActivationCode()
}
}

As mentioned above, Rails supports the ability to automatically hook into the persistence events , in the case above, to execute the specified closure at a particular point in the persistence lifecycle. Grails doesn't support this out of the box, but it is extremely easy to accomplish the same functionality by installing the Grails Hibernate Events Plugin, and then specify a couple of specially named closures

All in all, throughout the whole conversion I had the feeling that when the Grails folks sat down to figure out how to do things, they put a little bit of thought into how developers actually work with domain classes, what's readable, and what's not, whereas the Rails approach has a little bit more of a "hacked up" feel to it.