Sunday, December 21, 2014

Debugging ScalaTest tests in NetBeans with the Maven ScalaTest Plugin

In the spirit of creating blog posts whenever there is something important that I've figured out and I should not lose or forget, here I go.

A month or two ago, we moved all of our Java tests at Apprenda to run using the Maven Scalatest plugin . We have been using ScalaTest from day one; however, for a while there we were using SureFire + @RunWith + JUnitRunner annotations to kick off the tests. However, since IntelliJ was quite happy to run ScalaTest tests without anything else (e.g. like the @RunWith and JUnitRunner annotations), we would sometimes end up in a situation where we have some tests that are created during development in the IDE; however, when the build is run using just plain Maven, it would skip over these tests.

So, the as described in the ScalaTest documentation on working w/ the plugin , you first disable the surefire plugin, and then add the ScalaTest Maven plugin to run the tests. That all worked great, and now all of our tests run, regardless of whether we remembered to add the @RunWith annotation.

That presented a problem for me : when we were running the tests with SureFire, NetBeans was more than happy to run and debug the tests. However, when we switched to the Maven ScalaTest plugin - no such luck .. what do to ? I'm totally fine with not seeing the graphical test runner results that NetBeans shows w/ JUnit Tests ; however, where it becomes a problem is when I can't run or debug the individual tests from the IDE. The tests run just fine when you "Test" the whole project (e.g. right click on the project and choose "Test" from the context menu), but if you try to run an individual test (e.g. right click on a test case and choose Test from the context menu), or when you're inside the test case go to the Run -> Test File menu you're out of luck, nothing shows up.

So, getting the single test to run from NetBeans turns out to be pretty simple :
1. In the Project Properties -> Actions panel, choose the "Test File" action, change the properties from "test=${packageClassName}" to "suites=${packageClassName}" . As indicated in the ScalaTest documentation, the way to tell ScalaTest what test to run is using the suites system property, e.g. :


So, that's great, but how do you debug the test ? Looking at the ScalaTest documentation I was a bit confused on how to do this, as there were a few options related to debugging, but which ones to set in order to get this from NetBeans, it wasn't entirely clear.

It turns out the fix was fairly simple :
1. Since by default NetBeans runs surefire:test to run individual tests, the goal that is run needed to be switched to just "test" - this allows the Maven Scalatest plugin to run (as it binds to the test phase and does nothing for surefire:test)
2. I had to add  a couple of additional system properties that ScalaTest needs in order to run the right test, turn on debugging, and connect the NetBeans debugger and the ScalaTest test that is running.

#This teslls scalatest to run the test with this class
suites=${packageClassName}

#These tell ScalaTest to start the new process with debugging enabled
logForkedProcessCommand=true
debugForkedProcess=true
debugArgLine=-Xdebug -Xrunjdwp:transport=dt_socket,server=n,address=${jpda.address}

# This tells netbeans to fire up the debugger and wait for a connection
jpda.listen=true

Here's an example of what it looks like :


Tada - enjoy being able to run and debug individual ScalaTest tests right from NetBeans !


Friday, March 07, 2014

Intro to Programming : Drawing a House

What is this 

To help everyone along in getting started with drawing the Minecraft Creeper, I asked my son to put together a program that draws a house. It uses a lot of similar elements to the Creeper that the students need to draw, and might show a few new things that we didn't cover in class yet.

The Code

   
  clear()
  println("setAnimationDelay() sets how fast the turtle speed is, invisible makes the turtle invisible but the line is still there")
  println("penUp() make the line disapear but the turtle doesn't, setFillColor(Color(0, 0 ,0)) and setPencolor(Color(0, 0, 0,))  changes the color")
  println("repeat(){ } makes the program repeat as many time as you want")
  setAnimationDelay(100)
  invisible()
  penUp()
  left()
  forward(150)
  setFillColor(Color(255, 0, 51))
  setPenColor(Color(255, 0, 51))
  penDown()
  right()
  //makes the square for the house, note the usage of 'repeat'
  repeat(4){
    forward(150)
    right()
  }
  forward(150)
  //this makes the roof
  setFillColor(Color(51, 51, 0))
  setPenColor(Color(51, 51, 0))
  right(60)
  forward(90)
  right(60)
  forward(90)
  penUp()
  //this makes the windows
  setFillColor(Color(51, 153, 255))
  setPenColor(Color(51, 153, 255))
  right(60)
  forward(40)
  right()
  forward(20)
  penDown()
  forward(30)
  right()
  forward(30)
  right()
  forward(30)
  right()
  right()
  penUp()
  forward(80)
  penDown()
  forward(30)
  left()
  forward(30)
  left()
  forward(30)
  left()
  forward(30)
  left()
  penUp()
  left()
  forward(80)
  penDown()
  //this makes the door
  setPenColor(Color(153, 68, 0))
  setFillColor(Color(153, 68, 0))
  forward(60)
  left()
  forward(35)
  left()
  forward(60)
  left()

The Outcome

The finished product looks something like this 


Intro to Programming : The First Class

.. And so it begins... 


This spring, I am teaching an "Intro to Programming" class at the After School Enrichment program at Craig Elementary, so this blog will get some new content with the progress of the class.

The First Class


In the first class, we covered quite a lot of ground : we learned quite a bit about each other, what the students in the class were interested in. As expected, most kids do enjoy video games, like learning how things work, and just plain enjoy working with computers. We briefly chatted about why people program in the first place : to express themselves, to tackle new challenges, and to be able to harness the power of computers for their own inventions.

We covered some of the basic concepts of what a program is : a sequence of instructions that follow some specific grammar rules (just like they do in English). We had a quick introduction to Kojo (our programming environment, more on that later) and the various elements of Kojo's user interface - the command / script area, the drawing area, the menus, the output / error message area. Most importantly, we focused on how to continue learning from the environment - using code completion / prompts to see the syntax of commands that we hadn't used before, reading the command documentation. We also spent some time learning to recover from failure, when something unexpected happens - resetting the zoom level on the drawing area (if one accidentally zoomed out too far), and just bringing up the right windows if one of them suddenly disappeared.

Our first programming exercise really didn't involve a computer : I asked my students to "program me" and command me from one side of the room to the other, while avoiding the obstacles along the way - chairs, large metal poles, backpacks. I did attempt to behave like a computer - I just followed the instructions that were given to me and failed a few times along the way - ran into an office chair, gonked my head against the metal pole. In order to tie up with what came next (which was drawing a square in our programming environment), I then asked the kids to use the same commands that they used to guide me through the room, but this time, to make me walk in a square along the tiled floor using the same limited set of commands - e.g. left, right, forward, back.


So, with the basic commands under our belt, the kids got to programming. We learned how to draw a square. First everyone came up with a short program for a square, and then we experimented with variations on the topic - some of the kids really enjoyed drawing BIG squares and seeing the turtle in action while it was drawing the squares. Then, for the more ambitious students, we tried drawing a triangle (and yes, this is where the geometry skills came shining through - what were the angles in an equilateral triangle, you ask :-) ). The example looks something like this :


The takeaway : for the kids who want a little challenge at home, I asked them to practice drawing a Minecraft Creeper, which very roughly, looks like this - it will give the kids a chance to practice some of the skills that they've already picked up (e.g. drawing squares), but also give a chance to learn a few new things as well (using background and fill colors)


Setting up Kojo

Kojo is a very kid-friendly piece of software which was created specifically to help children learn about programming and have fun along the way. It should run on all modern OS-s (Windows, Linux, MacOS), so as long as you have a desktop computer to install this on (but it will not work on a tablet), your child should be able to continue exploring it on their own. It contains a rich library of examples written in Kojo (which we will lean on in the class) - it even has a game or two that the kids can play with.

Setting up Kojo is pretty straighforward:
1. Dowload Kojo from http://www.kogics.net/kojo-download
2. Run the downloaded .jar file (e.g. by right clicking and choosing "Run" on windows), it will launch the installer - just follow through the installer and you should have an icon on your desktop that you can use to launch the software.


Monday, January 16, 2012

Tynamo committer, new Tynamo module:tapestry-jdo

The Announcement: 
First of all the announcement : as a new commiter to Tynamo, I have just released a new module, Tapestry-JDO, which allows Tapestry users to build applications based on JDO using familiar (from Hibernate and JPA integrations) Tapestry idioms for persistence manager injection and transaction management (using @CommitAfter). The official announcement is on the Tynamo Blog

The History
How that came about...

I've been a Tapestry user for a few years, usually lurking on the mailing lists and answering a question here and there , wherever I could contribute. I've always enjoyed Tapestry's approach to building web apps : pages, components, and annotation driven magic has been quite enjoyable, and the out of the box live class reloading make the experience pleasant and productive. At first I somewhat loathed the heavy emphasis on annotations to drive the framework magic; however, having dealt w/ the Grails' way of doing it for a few years, it now seems a bit  preferable for being more clear and explicit.

Fast forward a few years, Google announced the App Engine (GAE) and I was totally blown away of how they turned the world of java web app hosting on its head. Prior to GAE, Java web app hosting was both expensive and inconvenient - who would want to build publicly facing java apps, no wonder PHP ruled the roost . Of the two persistence APIs on the App Engine, JDO was the more familiar one, having spent a few years on the job working w/ JDO. Prior to GAE's choice to use JDO as a persistence API (at least in my world) it seemed like a dead end. Hibernate and JPA had taken the world by storm, and nobody seemed to care about JDO any longer. Another reason why JDO seemed interesting on the App Engine is that from its very inception JDO claimed that it was not necessarily married to relational databases. While back in the day that seemed to me like a not-so-interesting design goal, when GAE chose it as one of the options it seemed to make so much more sense to use that, as the backend store of GAE is non relational. Today, with the rise of  NoSQL, it really starts clicking (e.g. DataNucleus MongoDB  support) - all of a sudden, the same skillset that you've developed from the relational ORM days, you can apply in non-relational contexts - sweet !

So,  along the way I built a couple of apps to run on the App Engine - a site for  math problem solving assistance service and an artwork portfolio site . Neither of the apps were particularly complicated or difficult to build from a development point of view, but had just enough interaction w/ the back end where I had to deal w/ JDO directly - e.g. getting persistence managers, starting sessions, committing, all that. As much as I find Spring to be a useful tool in the toolbox, booting up a full blown spring container just too much for a simple web app. Additionally, the existence of tapestry-ioc makes Spring redundant and way too verbose for many of its possible usages within a simple web app. On the other hand, without Spring, manual transaction management is a royal PITA and I was looking for a better of way doing it. My first stab was to set up a Spring  dependency (w/o a spring container) to just get the Transaction manager classes and wire them up in Tapestry IOC. It worked pretty decently but the integration was just a kludge, not to mention the few megabytes that the four classes from Spring I used brought down with them.

Having been on the Tapestry mailing lists, the Tynamo project has continued to impress me with the suite of modules that the project kept releasing to fill needs in the tapestry community - e.g. jpa, security, routing, openid authentication, and more. Thus, when I started wondering where to look for an example of how to build the JDO support, Tynamo was the first candidate. So, I grabbed  Tynamo-JPA, moved some things around replaced all the usages of the JPA Entity Manager w/ JDO's PersistenceManager, touched every piece of code in the module and before you know it I had a working basic setup that allowed me to inject a PersistenceManager and use a @CommitAfter annotation to set up some automatic transaction management for myself. With that basic implementation I was able to finish the project that I was working on and everything looked great.

Then, came the question of what to do w/ my changes. It seemed that something like this might be a valuable contribution to the Tapestry community, yet I didn't quite feel like setting up a project somewhere . So, I figured, since I heavily borrowed from Tynamo in the implementation, why not ask them if they would be interested in having the module be a part of their project. On first thought it seemed like a long shot, my scrappy JDO module couldn't possibly fit within the pure awesomeness of Tynamo. Yet, I figured, it's worth a shot.  Shortly after I asked if they wanted it, they said yes, I zipped up the source and sent it out. I didn't necessarily plan on becoming a committer on the project, but before I knew it , Kalle had added me to the list and given me access to SVN, and posted an announcement on the blog about a new member of the project. I was a bit surprised by the warm welcome I received - I certainly felt that my contribution was appreciated.

To make the long story short, a few months later, major code and javadoc cleanup, fixing the tests and stepping through the Tynamo / Codehaus release process, the cat is out of the bag - the module is released, the announcements are out. I hope this new module is useful to someone.

Enjoy ! 

Thursday, December 01, 2011

Ad-Hockery functional testing : UI Elements and Selenium experience

This post is a response to Rob's posting on functional testing that just became too long to post in a comment...

-----------
At my job, we've used the UI elements approach pretty extensively and at this time we're moving away from it on a new project.

Conceptually, I've also enjoyed the idea that the location logic is sitting in the same tier as the elements that are being located. The support in S-IDE is also quite nice and impressive (e.g. code completion, documentation), the built-in support for unit testing the locators is quite nice.

Now, the downsides....

  • UI Elements development / future : although it is technically a part of Selenium, in practice UI Elements support don't actually evolve in lockstep with it. On a conference call/presentation w/ one of Selenium's maintainers a few months ago, when I asked about UI elements, he indicated that they might be moved out of the core (he didn't seem to be particularly fond of them, I almost had the feeling that he was tempted to just drop the feature). There isn't much of a community using them in the first place, thus if something breaks they can remain broken for a while until someone notices (when that happened to us, the turnaround was pretty quick; although I'm not sure if that is the way it is or because the author of UI elements for Selenium was a former employee).

  • The skills gap : the fact that the UI element definitions are defined outside the main "test case authoring" environment (which in our case is Groovy), makes it another distinct skill that team members (often QA folks) need to acquire. When it comes to Javascript, being a user is easy, being an author who can sling Javascript and write nifty unit tests (typically not a QA skillset) inside of the UI elements is not that easy. At least in our case it led to a bunch of not very well maintained UI Elements, w/ most of the Unit tests commented out and the knowledge of writing UI Elements withing the QA team considered almost a Dark Art. As a result of all this

  • Development cadence issues : although the usage of UI elements in a test case seems very sexy, the same "development cadence" for UI Elements is kinda slow (this could be my own ignorance as well). Basically, if you wanted to enhance a UI element, you would write some Javascript to set up the UI Element definitions and then close S-IDE and open it up again. If your unit test failed, then you would get a bunch of popups about the failing tests, the UI Elements would be disabled and you're back to editing the javascript file until the unit test passes. Only after that, you can try using the UI element in S-IDE or in your test case. Finally, if you were using selenium-server to run your "real" test cases (like we did), you need to restart selenium server (RC) so that it can pick up the updated UI Elements.

  • UI Element organization : this could be an artifact of our own failings w/ UI elements and not necessarily a problem w/ the framework itself; however, the lack of a well defined approach to structuring them has led us into a massive set of pagesets that contains UI elements for a whole bunch of different pages. Thus, when you try to pick up a UI element there isn't a good organizing principle ("Oh, yeah, I'm on the Login page, lemme see what I can locate there") - instead we have something along the lines of ("I'm in feature 'foo', let me see which one of the several hundred UI element in the fooFeaturePageSet might fit").


Although the Page object approach is not a silver bullet it addresses a bunch of the issues above:
  • Skillset - the same skills that test authors use to write test cases, they use to write the abstraction (page objects)
  • A clear organizing principle - people get it, pages have stuff in them, putting the location logic for an element on a page inside of the corresponding page object makes sense. Then, using that is just a method call
  • Deployment / Cadence issues - there is no longer the impedance mismatch of "I want to run this test case, did I re-deploy the UI elements that it depends on?". You just run the test, the testing framework will recompile the modified page objects and the test case runs, no need to do anything w/ Selenium server or anything else.
Anyway, just my 2c on the subject.

Wednesday, November 30, 2011

My Scala (and Tapestry 5) experience

Since both a couple of coworkers asked me about Scala in the last few weeks, I thought these might be interesting to read through (something that emerged over the last few days)

  •  http://codahale.com/downloads/email-to-donald.txt
  •  http://codahale.com/the-rest-of-the-story/


I have obviously not used Scala to the extent that the guy describes, but I can testify at how annoying it is the constant translation between Java and Scala (especially, since my small app, , was using Tapestry 5, which is obviously a Java framework). The conversion between the two was made worse (at least for me, a total Scala newb) by the following:

  • Classes with the same names but completely or subtly different usages and intents . The fact that the Scala library used the same class names as the Java library (java.lang.Long and scala.Long) , the default imports use them, and there are some magical conversions that occur between the eponymous types. On a few occasions I was totally baffled about something not working only to find that in the end, the code was getting the wrong type . Thus, in a bunch of my classes, I ended up explicitly having to import the Java classes that the framework expected to work with , e.g. 
      
         import java.util.{List => JList }
         import org.slf4j.Logger
         import scala.collection.JavaConversions._
    
         class FooPage {
    
    
     @Property
     private var catPieces:JList[ArtPiece] = _
    
    
            // explicitly declaring the returning types as the Java types
     def onPassivate():JList[String]= {
                    // and using the Scala provided conversions
      return seqAsJavaList(List(category,subCategory))
     }
    
         }
          
    
    and then explicitly use the java specific types. A similar but different situation exists with java.util.List and the scala List classes (e.g.  scala.collections.immutable.List) although they have the same name they have a completely different purpose (e.g. the Scala list is not necessarily intended to be created, and manipulated like the Java list); the equivalent of the java list is the recommended Scala ListBuffer
  • Null handling -  because I was interacting w/ a Java framework, there was an expectation that nulls are OK and at different places, the framework does expect methods to return nulls in order to behave in certain ways. Scala goes for the whole Option pattern (where you aren't supposed to use nulls to make it all better) and has some conversion (that I obviously, don't fully understand) between null and these types. However, because of the interaction w/ the Java framework, I had to learn how to deal with both. It kinda sucked.
  • Tapestry 5 and Scala interactions -  because Tapestry 5 pushes the envelope on being a Java framework w/ a whole bunch of annotation processing, class transformations, etc. , in some cases there were clashes between the T5 approach and Scala. In some respects, Tapestry 5 manages to be a respectable and succinct Java framework by adding a whole bunch of metaprogramming features, which when used with Scala make the scala code less attractive, e.g: 
    • Page properties that would otherwise be set up as private fields in regular Tapestry 5, now have to be declared as private fields and initialized. If you didn't declare them as private, then T5 would complain (since pages can't have non-private members as it is managed by T5) , e.g. :
        
        class Foo {      
              @Inject 
       var logger:Logger = _
         
       @Inject 
       var pm:PersistenceManager = _
        }   
      
    • Sometimes the T5 and Scala approaches seemed to clash in ways that make things complicated. For example, in the persistent objects in the class, I often annotated the private fields w/ @BeanProperty (so that Scala generates proper getters/setters for those fields).
        
        import scala.reflect.BeanProperty
        import javax.jdo.annotations.Persistent;
        class PersistentFoo {      
              @BeanProperty 
       @Persistent
       var title = ""
      
        }   
      
      Yet, when I accidentally did the same for some page properties at weird points the application would start failing (on application reload with Tapestry's live class reloading) until in pages I replaced the approach w/ Tapestry's @Property annotation (although they're supposed to do the same it's quirky w/ BeanProperty)
        
        import org.apache.tapestry5.annotations.Property; 
      
        class FooPage {      
              @Property 
       private var category:String = _
      
        }   


When I was working on the app, a few times I had to just stop for a day because I couldn't figure out how to do something massively simple (e.g. how to succinctly join a list of Strings into a comma separated string - stuff that would have taken me 30 seconds to do in Java, 2 seconds in Groovy and the proposed Scala solutions seemed like massive overkill). I originally started wanting to write some tests in Scala for this app, because I thought, "wouldn't it be nice to have something a little more flexible and less verbose than Java", but that still has nice static typing. Later I decided to try the whole Scala+T5 approach, and I have to admit I was pretty mad at myself when I would get stuck .

Obviously, many of my problems described above were due to my own weak Scala-foo (e.g. I had read through at least 2-3 books in order to be brave enough to try this just to learn that until I try things hands on, it doesn't stick too well), and other issues that I had were due to the interaction w/ the specific Java framework that I chose (Tapestry 5). Yet, in some ways, the experience was somewhat disappointing - having worked w/ Groovy for the last few years there is a massive difference in the approaches of the two languages. Where Groovy would often sacrifice some "internal beauty" in order to make a Java developer's life sweet and pleasant, e.g. :

  • Joining a list of strings
     
       [1,2,3].join(",");
    
  • string formatting using $ inside of strings
     
       "Blah blah $fooVar"
    
  • Null safe dereference
     
       foo?.bar
    
... whereas Scala somehow gets stuck in an ideological mode e.g.


One part of my setup that worked very  well and I enjoyed quite a bit was the Continuous Compilation and Tapestry's Live Class Reloading. Whereas for prior Tapestry pure-Java projects I had to rely on IDE magic to do some Compile-on-Save so that Tapestry can reload the changed classes, w/ the Scala setup it was much nicer.  I set up a Maven project w/ the Scala Maven plugin , and then kick off the scala:cc goal  to make it compile the changed page classes into my project. Thus, I had a completely IDE-independent setup that gave me a live-reloading experience on-par (and possibly beyond) the reloading experience with Grails.

In the end, after I managed to work through some of the issues described above, it ended up being a pretty reasonable set up and I was able to make pretty decent progress in getting the app out the door (for my wife's birthday). At the same time, I wasn't really able to leverage any cool Scala features that would magically boost my productivity, or make the codebase significantly cleaner or smaller (in some respects, it feels like the Scala based code is more verbose because of all the conversions and casting into Java types). I feel that if I knew more about Scala and was more knowledgeable about Tapestry internals, I might be able to write a Tapestr5 - Scala adapter layer that would plug into some of T5's extensions points to make it work more naturally with Tapestry (e.g. working w/ Scala lists in views, different handling of null values, etc). As a learning experience - I learned a lot, both about things that were interesting and useful (a bit of functional programming, Java/Scala integration), and some things that I really didn't want to know that much about (how Scala and T5 munge the Java classes to make the things tick).

In any event, the advice to people who like to try this kind of integration would be to allow yourself plenty of time for learning and experimentation w/ Scala and not giving up too early ( as I was almost ready to do on a few occasions). Fanf's blog has a few blog entries and a project on GitHub that is  an excellent starting point.


Wednesday, June 15, 2011

Grails, Web Flows, and redirecting out

If you read the Grails Web Flow documentation it all seems pretty straightforward - start,end states, transitions, actions, events, it's all good. However, just like any other technology that seems like magic, there always is some kind of a catch once you start using it.

One of the little 'gotchas' that I ran into was how to properly complete the flow. Now, reading up the documentation, it would seem easy - at the end of your wizard/flow, you just redirect to a different controller+action and it's all good. It all makes sense - often time, the wizard walks through multiple steps, collects some information, and when it's all done (you save your brand new Foo), you can just redirect to the details page for foo (e.g. /foo/show/1).

Well you thought it would be that easy. Not that quick...

The Grails web flow documentation is kinda deceptive like that. It shows you a simplistic example that works; however, when you try to do something more realistic, then you start getting into trouble. So, the example form the docs looks like this:

  def fooFlow = { 
       def startState { }

       def endState {
             redirect(controller:'foo', action:'bar')
       }

  }

The catch is that in their examples, the redirect is to a static URL that doesn't take any parameters.The problem comes up when in the end state you try to pass in some parameter from the flow (e.g. which often is the case e.g. at the end of the flow you want to display the details page (e.g. redirect(controller:'foo', action:'bar', id:flow.fooId) . The problem manifests itself in a weird way - the web flow would store a particular value of flow property( e.g. flow.fooId (under onditions that I couldn't figure out), and even though your current wizard might have stored a particular value from the current flow, for whatever reason it ends up redirecting to a value stored from a previous flow. So, the wizard 'kinda' worked in that it redirected to a details page at the end of the wizard, but in a large percentage of the time, it would redirect to the wrong details page. From what I could gather, the issue is that in the end state, the redirect cannot use any values from the flow, session, or flash and as a result uses some cached value (possibly from the first flow execution)

The solution to this (which is somewhere on the Grails mailing lists) is as follows: add an explicit empty "end" state (including an empty gsp to match the end state name), and in the states that transition into the end flow, issue the redirect from the penultimate state, e.g.

   def fooFlow = {
       def startState { }

       def beforeEnd {
             action {
                  redirect(controller:'foo', action:'bar', id:flow.fooId)
             }
             on("success").to "end"
       }

       def end( 
          /** note that this requries an end.gsp to be present
              in the flow subdirectory, but it never gets rendered after the
              redirect **/
       )
   }

Now, with this trick at hand, the end.gsp never gets rendered, and the client browsers do get redirected to the detail pages that you want to display, outside of your web flow.

As a more Web Flow centric alternative, you could always store the relevant object (Foo) inside the flow and display any relevant details about the object in the end state (end.gsp)

Sunday, April 03, 2011

NetBeans Database Explorer API and databases in NetBeans

At the recent NetBeans Platform Certified Training organized by Visitrend we were discussing how to work w/ the built in database functionality. NetBeans ships w/ a pretty decent database/SQL functionality out of the box - you can connect to any JDBC compliant database, add your drivers, sling queries, edit the results. It even has code completion for SQL queries - up until SQL Server 2005 it even provided better support for SQL code authoring than the built in Management tools ( and it is still better than the standard Mysql console).


Now, it turns out that for data driven applications, it is a pretty common occurrence that the users need to connect to a database. Sometimes it makes sense to hide the details of the database; at the same time, when you're dealing with sophisticated that have intimate knowledge of the underlying database schema and need to be able to deal with the underlying data, hiding the fact that they're dealing with a database just doesn't make sense. In our case, we have a team of QA Engineers who need to be able to look into all aspects of the database behind the application, so the best a tool can do is to make the setup and access to the database as easy and transparent as possible.

Thus, to solve this problem, my users need the following :
1. Make sure that the IDE has the proper drivers set up to access our test databases
2. Easy setup of the database connection with the details for a specific project/system under tes

Automatically setting up JDBC driver

Unfortunately, Microsoft's SQL Server is not one of the JDBC drivers that ships with the IDE. A new user could just navigate to the "Drivers" node in the "Services" top component and walk through the wizard to register a new driver. This can certainly be an extra step in the list of "setup instructions". But, why should a user have to remember to do that if we can do it in a module. Thus, the first hurdle we need to overcome is have a module that automatically registers the JDBC driver in the IDE :

1. First, we need to  provide the MSSQL JDBC driver.

For that, I created a new Library Wrapper module. I wanted to mention this because for whatever reason when I tried providing the JDBC driver and the XML registration below in the same module, it failed to find the JDBC driver.


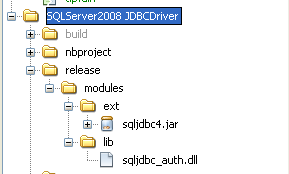
In the general case for a pure JDBC driver, this should be enough. However, in order to support windows authentication, the JDBC driver needs to have a   dll included on the path. In order to sutpport jars that need native libraries, the native library needs to be placed in the release/modules/lib as indicated on Modules API Javadoc


2. Create a second module for the actual driver registration.

Add an XML descriptor for registering new drivers (named SQLServer2008Driver.xml). For MSSQL it looks like this :


<?xml version='1.0'?>
<!DOCTYPE driver PUBLIC '-//NetBeans//DTD JDBC Driver 1.1//EN' 'http://www.netbeans.org/dtds/jdbc-driver-1_1.dtd'>
<driver>
  <name value='SQLServer2008'/>
  <display-name value='Microsoft SQL Server 2008'/>
  <class value='com.microsoft.sqlserver.jdbc.SQLServerDriver'/>
  <urls>
      <url value="nbinst:/modules/ext/sqljdbc4.jar"/>
  </urls>
</driver>


I am not entirely sure of the meaning of the nbinst: prefix, but this works.

3. Add an entry into the layer.xml file of the second module to add the driver registration XML : 


Unfortunately, in the case of the MSSQL JDBC driver just adding the dll into the module doesn't cut it as it appears that the SQL Server driver also depends on other DLLs, so it actually needs to be in c:\windows\system32 . Thus, adding the jdbc driver dll would have been not needed, as the dll needs to be copied to windows\system32 directory. To do that, register a module installer  :


public class MssqlDriverInstaller extends ModuleInstall {

    @Override
    public void restored() {
        File mssqlJdbcDll = new File(System.getenv("windir"), "system32\\sqljdbc_auth.dll");
        boolean foundDll = mssqlJdbcDll.exists();
        
        if (!foundDll) {
            FileOutputStream system32MssqlDll = null;
            InputStream bundledDll = null;
            try {
                system32MssqlDll = new FileOutputStream(mssqlJdbcDll);
                bundledDll = MssqlDriverInstaller.class.getResourceAsStream("sqljdbc_auth.dll");
                System.out.println("Copying sqljdbc_auth.dll to windows system32");
                FileUtil.copy(bundledDll, system32MssqlDll);

            } catch (IOException ex) {
                Logger.getLogger(MssqlDriverInstaller.class.getName()).log(Level.SEVERE, null, ex);
            } finally {
                try {
                    system32MssqlDll.close();
                } catch (IOException ex) {
                    Logger.getLogger(MssqlDriverInstaller.class.getName()).log(Level.SEVERE, null, ex);
                }
                try {
                    bundledDll.close();
                } catch (IOException ex) {
                    Logger.getLogger(MssqlDriverInstaller.class.getName()).log(Level.SEVERE, null, ex);
                }
            }
        }
    }
}


Automatically connecting to the database


Now, the last step is, how to automate the creation of the database connection node now that we can now be sure that the IDE has the right driver to connect to the database: (the APIs used below are from the Database Explorer API, org.netbeans.api.db.explorer)  


public void createProjectConnection(DatabaseConfig dbc) {

        DatabaseConfig dbConfig = dbc;
        if (dbConfig == null) {
            dbConfig = DatabaseConfig.getDefault();
        }

        JDBCDriver sqlSrvDrv = findSqlServerDriver();

        if (sqlSrvDrv != null) {
            try {
                DatabaseConnection dbConn = createDbConnection(dbConfig, sqlSrvDrv);

                final ConnectionManager connMgr = ConnectionManager.getDefault();
                DatabaseConnection foundConn = findSameConnection(dbConn);
                if (foundConn == null) {
                    foundConn = dbConn;
                    connMgr.addConnection(dbConn);
                }

                final DatabaseConnection dbConn2 = foundConn;
                RequestProcessor.getDefault().post(new Runnable() {

                    @Override
                    public void run() {
                        try {
                            connMgr.connect(dbConn2);
                            connMgr.selectConnectionInExplorer(dbConn2);
                        } catch (DatabaseException ex) {
                            Logger.getLogger(Ats3ProjectDataService.class.getName()).log(Level.SEVERE, "Failed to connect to database", ex);
                        }
                    }
                });

            } catch (DatabaseException ex) {
                Logger.getLogger(Ats3ProjectDataService.class.getName()).log(Level.SEVERE, "Failed to connect to database", ex);
            }
        }
    }

    private DatabaseConnection createDbConnection(DatabaseConfig dbConfig, JDBCDriver sqlSrvDrv) {
        DatabaseConnection dbConn;
        String url = null;
        String userDb = dbConfig.getName();
        if (userDb != null) {
            if (userDb.contains("${username}")) {
                userDb = userDb.replace("${username}", System.getProperty("user.name"));
            }
        } else {
            userDb = System.getProperty("user.name") + "_sb_rc";
        }
        if (!dbConfig.getUseSqlAuth()) {
            url = String.format("jdbc:sqlserver://%s:1433;databaseName=%s;integratedSecurity=true", dbConfig.getServer(), userDb);
            dbConn = DatabaseConnection.create(sqlSrvDrv, url, "", "dbo", "", true);
        } else {
            url = String.format("jdbc:sqlserver://%s:1433;databaseName=%s", dbConfig.getServer(), userDb);
            dbConn = DatabaseConnection.create(sqlSrvDrv, url, dbConfig.getUser(), "dbo", dbConfig.getPassword(), true);
        }
        return dbConn;
    }

    private JDBCDriver findSqlServerDriver() {
        JDBCDriver sqlSrvDrv = null;
        JDBCDriver[] drivers = JDBCDriverManager.getDefault().getDrivers("com.microsoft.sqlserver.jdbc.SQLServerDriver");
        // we know that there should be at least one as this module registers it
        for (JDBCDriver drv : drivers) {
            if ("SQLServer2008".equals(drv.getName())) {
                sqlSrvDrv = drv;
            }
        }
        return sqlSrvDrv;
    }

    private DatabaseConnection findSameConnection(DatabaseConnection dbConn) {
        DatabaseConnection foundConn = null;
        ConnectionManager connMgr = ConnectionManager.getDefault();
        for (DatabaseConnection dbc : connMgr.getConnections()) {
            if (dbc.getDatabaseURL().equals(dbConn.getDatabaseURL())) {
                foundConn = dbc;
            }
        }

        return foundConn;
    } 

Tuesday, October 26, 2010

Why Oracle should do something about the Apple fiasco

I very strongly dislike Apple and after this latest stunt even more so. Seriously.

Sometimes, people wonder : why should Oracle do something about the situation when it's pretty obviously Apple's decision that lead to this. So, here I go:

1. Apple has nothing to lose by not supporting Java on OSX. So, they might lose a few thousand (tens of thousands? maybe...) Apple laptop toting java developers. It's a drop in the sea of iPhone, iPad, and iPod sales. So, maybe the same number of devs might not buy the next OSX upgrade - whooptie doo...

2. Oracle owns Java. They have wanted to "own" Java for the longest time, they even bought a whole company (Sun), hardware and all, just to get their grubby hands on it. Now, they own it and when Apple drops the ball, it's now up to Oracle to step up to the plate and show what "owning" the platform really means to them.

I'm sure Adobe would like if Apple produced their own compatible Flash for OSX, but Apple doesn't - Adobe does. Why ? 'Cause they own the platform.

3. Oracle has the most to lose from this development - if Java doesn't run on MacOS, then much of the wonderful cross-platform claims of Java become somewhat gimpy as now Java will not run on a fairly mainstream modern client OS. Not very cool, especially since Java (based on Oracle's own statements) wants to be on the desktop.


From a personal perspective, I could care less about Java on Apple (although I did sign the petition as well). Up until now, I would have recommended it to people acknowledging it being a decent OS. Going forward, despite my dislike for Microsoft, I'd probably just recommend Windows 7. Not that this matters all that much, not too many people ask me.

Finally, why are people are asking Oracle to do something and not Apple ? Really, it makes so much more sense to appeal to the company that caused the problem in the first place. However, as much as Oracle has been sucking in their relationship with the community lately, they are light years away from Apple's blindness and deafness to the needs of their customers when those needs happen to be at odds with the cult leader's ideas (e.g. no flash on iphones yet despite ample evidence that it's a part of a modern web experience, even for the mobile web)

Thursday, October 21, 2010

Apple and Java Devs - enough is enough !

There was a line in the iRobot movie with Will Smith where he says "Somehow 'I told you so' just doesn't cut it..." after the chick in the movie finally saw how her robots actually malfunctioned and tried taking over the world (which Will Smith had been telling her all along).

Anyway, Apple has been on this trajectory for the longest time. Even since MANY years ago Jobs had promised that he would make the mac the best platform for Java developers, a whole bunch of java devs have been lugging macs to conferences trying to look cool and consoling themselves with the thought that "it's actually Unix underneath, and it's pretty, so it's perfect". All that despite that Apple has been dissing them for the longest time - I remember how at first it felt weird when Apple deprecated some quicktime java bindings, then came more and more rare java releases, then it took forever for Java 6 to come out, then the same paranioia moved into iphone, ipad, flash... the list goes on and on..

I do have an appreciation for the fervor with which Mac fans defend their platform of choice. I'm the same with Linux . Sometimes I would jump through some hoops that I probably would not have to go through if I was working in Windows. However, if tomorrow Linus Torvalds ( or some other cult figure in the community who could make that decision) came out and said that Linux is not going to run Java anymore (for some real or imaginary philosophical reason), despite my love for so many of the characteristics and ideas behind Linux, and despite my strong dislike for Windows and Microsoft, I would just switch to Windows. Seriously, I earn my livelihood with and because of Java, and if my OS vendor told me that my OS is not going to support me in earning my living - guess what - I will be switching my OS vendor.

Sure, there will probably be ways to continue to somehow run Java on Macs in the foreseeable future . Sooner or later Oracle probably come up with some Java version that somehow runs on a mac. You could probably run some unofficial build (e.g. from OpenJDK) that kinda works, or maybe you could run a Windows or Linux VirtualBox image and run the Java inside of that. But come on - as a Java developer , how many times does one need to be told that he/she is not wanted and shown the door ?

So, here comes my call for action (of course as a Linux fanboy_:-) ) . I hear that these days Macs run on Intel hardware anyway - whip out that copy of Ubuntu that you always said you'd try and take it out for a spin. Or try Fedora - it's quite decent. Worst case scenario - I've seen my better half use Windows 7 and it seems to be OK ( she doesn't curse it as much as XP ) - it does run Java, and if you've ever dealt with technologies you're already used to some level of hassle.

Tuesday, June 02, 2009

Quickly running a single Grails test in NetBeans

One thing in the current NetBeans Grails project is that out of the box, you can run all tests in the project from the project's context menu but you can't run individual tests. While that is all good and well when you only have a few tests, once the tests are piling up (or you just are interested in how a particular test works), it is much preferable to be able to execute a single test at a time.


There is an existing issue to address this (so, go and vote for the issue if it seems useful, would ya?), but in the meantime, you still need to run your individual tests, right ? So, what should you do ?


The trick is to just use the "Run Grails Command" feature in NetBeans and make it easily accessible so that you can run the test in a heartbeat.

Here's what the feature looks like:


  • Right click on the project and select the "Run Grails Command..." option


  • In the dialog, type "test-app" in the Filter text box, and then type in "TestName -unit" for unit tests, or "TestName -integration" for integration tests. Note that here "TestName" is the test class name minus the "Tests" suffix for unit tests and minus the "IntegrationTests" for integration tests.


The good news is that NetBeans remembers the command options from the previous run (not the command though) and if you pull up the dialog you just have to type "test-app" and hit enter and it will execute your previous test class.


Thus, the only thing you have left it to make it easy to call the "Execute Grails Command" - so, we just need to map a shortcut. In order to do that, go to Tools->Options->Key Map tab. In the "Search" box, type "grails", the "Execute Grails Command" action is there, click in the Shortcut column, type in your shortcut (I picked Ctrl+Alt-C) and hit OK.


Now, running your test the first time involves Ctrl-Alt-C, type "test-app", tab, type "FooBar -unit" and hitting enter. Kicking it off subsequently is Ctrl-Alt-C, type "test-app", hit enter and your tests are running !!!

BEAUTY !!!

Wednesday, May 13, 2009

RAD w/ Tapestry 5, NetBeans 6.7, Maven, and Jetty : Really !!!

One of the major upsides of using Tapestry 5 is the much touted live class and template reloading. Up until recently, if you followed my previous post on working with Tapestry 5 and NetBeans, you probably ended w/ a workable solution, but still not ideal , as the live template and class reloading wasn't exactly working as expected. As a result, whenever you wanted to see the changes that you made in the live app (after running mvn jetty:run) you had to do the following:


mvn compile resources:resources
.........
-----------
[INFO] BUILD SUCCESSFUL
[INFO] ------------------------------------------------------------------------
[INFO] Total time: 18 seconds
[INFO] Finished at: Wed May 13 03:16:32 EDT 2009
[INFO] Final Memory: 16M/71M


The issue here was that NetBeans (in 6.1 and prior) did not support CopyOnSave or CompileOnSave properly in Maven projects (it did for NetBeans native projects, so if you had set up a NetBeans native project w/ explicit jar dependencies, etc it would work fine). The effect of running the above command was to compile your changes, and copy the compiled classes and modified resources into your <outputDirectory> (typically target/classes) . So, the 18 seconds above are not exactly something to lose sleep over, but it's still not the same like having the immediate Grails(or Rails)-like immediate feedback loop (that is, "Ctrl-S->Alt-Tab to browser->F5", which is "Save->Switch to Browser->Refresh").

In any case, help is on the way.


In the most recent version of NetBeans (in the 6.7 daily builds ), the issues w/ CopyOnSave support has been fixed (well, almost fixed, see the NetBeans IssuZilla issue), and now it transparently copies your modified resource files to target/[app-name]/WEB-INF/classes. Thus, with just a minor tweak, you can accomplish a Tapestry 5 Nirvana.


  1. First, set up a new Maven project by File->New Project->Select Maven project type. Follow my previous instructions on creating the actual project. Just a side note, for some reason the latest production T5 version (5.1) doesn't show up on the list of available archetypes in NetBeans.


  2. Running the app is easy, the default project comes w/ the Jetty plugin set up, so you can just run "mvn jetty:run" on the console.


  3. Alternatively, map a custom Maven goal in NetBeans by right clicking on the project, going to Custom-Goals and mapping jetty:run . See the screenshots for some extra help


  4. The default project setup comes with an Index page living in the web app context. Now that you ran Jetty, you should be able to just make changes to the template, and see them immediately. The secret here is that Jetty runs by default out of src/main/webapp, so T5 picks up the changes out of the box, no additional support by the IDE is needed.

    The problem here is that if you tried making changes to your page class (e.g. Index.java), they're not being picked up. Jetty runs from the classes in target/classes. The idea here is that we want to IDE to autocompile the changes, drop them into target/classes and have T5 pick up the new page classes. As mentioned at the beginning of the post, if you just ran the maven build again (e.g. mvn compiler:compile), but we need something better.

    OK, so, go to the project properties, go to the Build-Compile section. In the panel, select from the "Compile on Save" (COS) dropdown the "for both application and test execution".


    The trick to remember here is that this only works for "supported servers" (e.g. I know that at least Tomcat and Glassfish are in that list) where the IDE would compile the new classes, and re-deploy them on the server. Jetty is not one of these supported servers, and in order for the Compile-on-save goodness to work, the IDE needs to know you ran the app so that it can activate COS. Now, although you probably don't want to run the app in Tomcat , go ahead and run the app, select to run it in Tomcat. Now that you ran the app in Tomcat, NetBeans activated COS for this app, and now if you make new changes to your Index.java, NetBeans copies out the compiled classes to target/classes, and Jetty picks up the changes. After you run the app, you can just stop Tomcat (and the COS feature will continue working).


  5. This is pretty close to perfect. Trouble is, if you have any page templates under src/main/resources, you're still out of luck, as the resources don't get copied out into target/classes after you do the initial jetty:run. But don't despair, there is just one more step that will get us there.


  6. Add the following to your pom.xml


    <outputDirectory>${project.build.directory}/${project.build.finalName}/WEB-INF/classes</outputDirectory>


Now, this is a bit of a hack. Basically, we're telling maven to use the target/[app-name]/WEB-INF/classes to do the initial and any subsequent builds, which is where both the classes from src/main (and whereever else) and src/main/resources end up. The trick here is that this is the same directory that "mvn package" uses, and it is also the same directory that NetBeans uses for the Compile-on-save functionality. Basically, when you make changes to your page template sin src/main/resources (and after you've run your app in Tomcat once), NetBeans continues to compile the classes and copy the modified resources from src/main/resources and drop them into the target/[app-name]/WEB-INF/classes.


Considering that this is indeed a a hack, I filed a patch for NetBeans to properly support this T5 setup in Maven project. However, what got into 6.7 is only the fix to properly copy resources into target/[app-name]/WEB-INF/classes (and not in target/classes). The develoeper on the issue has some other ideas on how this should go, hopefully the full fix will go into the NetBeans version after 6.7. In the meantime, either use this little hack, or I'll probably try to repackage my fix as a standalone plugin to support this out of the box.

Wednesday, May 06, 2009

Converting legacy Rails apps to Grails : The Views

Alrighty, we're getting close to the finish line here. So far, we've covered General Project Setup, Migrating the Domain, Migrating the Controllers, and now we'll talk about migrating the views. After that, if I have a little bit of life left in me, I'll briefly speak about replacing the existing plugins in the Rails app w/ equivalent Grails plugin, and that should be the end of this series.

Now, on to the content.

  1. General Setup

  2. Layouts

  3. Page-by-page migration

  4. Tags

  5. Conclusion


1. General Setup


As you're probably used to it by now, the Grails and the Rails app have very similar approaches to storing views and templates. As you can see on the screenshots, the Rails views are in the "Views" project node, whereas in the Grails project, they're located in the "View and Layouts" project node. Inside of this folder, the views are partitioned by controller, e.g. the views and templates for controller "FooController" in the Grails app, sit inside of the view/foo subfolder.


2. Layouts

Another interesting folder in both Rails and Grails is the Layouts folder (in Grails, Views and Layouts - layouts project folder). There, the projects store the differet project layouts. The general idea here is mostly the same: different parts of the app will have different layout needs. Migrating the layouts from Rails to Grails involves mostly tag-for-tag conversion of the rhtml to gsp. A couple of useful facts about that process.

1. As mentioned in the previous post, both frameworks have a reasonable set of defaults for the layout selection. I can't quite remember all the details about how Rails chooses its defaults, but the converted application mostly specified on a per-controller basis by specifying the element, e.g. :


class FooController
layout "internal"
end

This Rails snippet will use the views/layouts/internal.rhtml layout.

There is no direct equivalent for specifying the desired layout inside of a controller in Grails. Instead, a user can add a layout with the same name as the controller (e.g. layouts/foo.gsp for FooController). Although I don't recall this being used in the Rails app, Grails also provides the ability to specify a template to use for rendering a view by specifying a <meta name="layout" content="landing"></meta>. Rendering a view that specifies the layout in this way will use the view/layouts/internal.gsp layout.

2. Converting the Rails layouts
The Rails layouts that I worked with used the following statements in the <head> element:


<head>
<%= stylesheet_link_merged :base %>
<%= stylesheet_link_merged :print, 'media' => 'print' %>

<%= javascript_include_merged :base %>
<%= javascript_include_merged :application %>
</head>


I can't quite say I know what all of the above statements do. I inspected the output the actual HTML output and replaced it with the following in my Grails template:


<head>
<link rel="shortcut icon" href="${createLinkTo(dir:'images',file:'favicon.ico')}" type="image/x-icon" />
<link rel="stylesheet" href="${createLinkTo(dir:'stylesheets/active_scaffold',file:'stylesheet.css')}" media="screen" type="text/css" />
<link href="${createLinkTo(dir:'stylesheets',file:'styles.css')}" media="screen" rel="Stylesheet" type="text/css" />
<link href="${createLinkTo(dir:'stylesheets',file:'print.css')}" media="print" rel="Stylesheet" type="text/css" />
<link href="${createLinkTo(dir:'stylesheets/active_scaffold/default',file:'stylesheet.css')}" media="screen" rel="Stylesheet" type="text/css" />
<!--[if IE]>
<link href="${createLinkTo(dir:'stylesheets/active_scaffold/default',file:'stylesheet-ie.css')}" media="screen" rel="Stylesheet" type="text/css" />
<![endif]-->
<g:layoutHead />
<g:javascript library="application" />
<g:javascript library="prototype" />
<g:javascript library="scriptaculous" />
</head>


A couple of things to note here :
* Using the ${createLinkTo()} tag inside of the stylesheet links : it is very convenient and makes the generation of the links pretty foolproof.
* Using the <g:layoutHead /> statement : allows the inclusion of any elements from the <head> element of the "client" page (the page that is using the layout).

Inside of the body of the template, the Rails template use the <%= yield%> statement to include the body of the client page. The equivalent statement in the Grails layout is the <g:layoutBody>

Finally, Rails allows client views to contribute "additional" content into the final output. In other words, the template can define an "area" where the client template can contribute markup, in a way that the said markup shows up in the parts of the layout that are generally rendered by the template. For example, if the client pages need to contribute markup to the content of the "sidebar", then, the layout would use something like the following:

<% if !@content_for_sidebar.nil? %>
<div id="right_sidebar_content_main">
<%= yield(:sidebar) %>
</div>
<% end %>


The client template, contributes to the layout as follows:

<% content_for :sidebar do%>
<div> This content will show up under the 'right_sidear_content_main' section in the final output </div>
<% end %>


In Grails, in order to implement the same feature, we have to resort to a less used and somewhat obscure feature of the underlying templating system that Grails users : Sitemesh. Here's the equivalent in the Grails project:

<g:if test="${pageProperty(name:'page.sidebar')!=null && pageProperty(name:'page.sidebar')!=''}">
<div id="right_sidebar_content_main">
<g:pageProperty name="page.sidebar" />
</div>
</g:if>


Now, in the "client" page, add content to the sidebar as follows:

<content tag="sidebar">
<g:render template="course_notes_side_bar" />
</content>

There is some additional info on using this feature in the Grails docs' for pageProperty tag, but more so in the Sitemesh user docs and just random blogs


3. Page-by-page migration
There is in most cases a 1-1 relationship between the views in both frameworks. Converting from the Rails views to the Grails views was mostly mechanical : see the Rails tag, find the equivalent Grails tag, and then figure out how to map the Rails tag attributes to the Grails tag attributes. In most cases, the two are similar enough and the conversion is fairly easy. At other times, Rails did provide some more features not present in Grails and migrating the pages did require some level of thought and effort. Even in that case, even for the tags that don't have a Grails equivalent, after the first couple of tags the conversion is always the same. Here's an example of an easy conversion:

In Rails:

<%= link_to_remote "Upload File",
{:url => { :controller => 'activity_items', :action => 'show_upload_form', :activity_id => @act_id},
:before => "Element.show('show_upload_form')" ,
:success => "Element.hide('show_upload_form');",
:update => { :success => "upload_form", :failure => "upload_form_errors" }},
{:class => "action", :title =>"Add a new file."} %>


In Grails:

<g:remoteLink controller='activityItems' action='show_upload_form'
params="[act_id:act_id]"
before="Element.show('show_upload_form')"
onSuccess="Element.hide('show_upload_form')"
update="[success:'upload_form', failure:'upload_form_errors']"
class="action" title="Add a new file"> Upload File </g:remoteLink>


Here's another one.

Rails:

<%= form_remote_tag :url => {:action => 'update',:controller => "activities", :id => @activity.id},
:before => "Element.show('form-indicator-activities')" ,
:success => "Element.hide('form-indicator-activities')" %>


Grails:

<g:formRemote url="[action:'update', controller:'activities', id:activity.id]" name="editActivityForm"
before="Element.show('form-indicator-activities')"
onSuccess="Element.hide('form-indicator-activities')">


I found that because the Rails app assumed to be deployed at the root of the context (e.g. http://localhost:3000/), whereas the Grails app always assumes that it will be deployed to a non-root context path (e.g. /foo), in many cases I found myself replacing static image references with links created with ${createLinkTo()}

FROM:
<img src="/images/indicator.gif" id='addurl' style='display:none;' />


TO:
<img src="${createLinkTo(dir:"images",file:"indicator.gif")}" id='addurl' style='display:none;' />


Here's an example of a Rails tag that didn't have a direct equivalent in Grails.

Rails:

<%= text_field_with_auto_complete(:course, :title, {:class=>"SearchTextBox", :value => " type here, then hit enter", :onclick=>"this.value=(this.value == ' type here, then hit enter')?'':this.value;", :onblur => "this.value=(this.value == '')?' type here, then hit enter':this.value;"}, completion_options = {}) %>


In Grails, I created a template that contained the same html + javascript that the Rails tag produced:

<%-- The content below was migrated from the Rails app, could be improved if using a plugin providing a cleaner autocompletion setup --%>
Search

<style type="text/css">
div.auto_complete {
width: 350px;
background: #fff;
}
div.auto_complete ul {
border:1px solid #888;
margin:0;
padding:0;
width:100%;
list-style-type:none;
}
div.auto_complete ul li {
margin:0;
padding:3px;
}
div.auto_complete ul li.selected {
background-color: #ffb;
}
div.auto_complete ul strong.highlight {
color: #800;
margin:0;
padding:0;
}
</style>
<input autocomplete="off" class="SearchTextBox" id="course_title" name="course.title" onblur="this.value=(this.value == '')?' type here, then hit enter':this.value;" onclick="this.value=(this.value == ' type here, then hit enter')?'':this.value;" size="30" value=" type here, then hit enter" type="text">

<div style="position: absolute; left: 1275px; top: 161px; width: 230px; display: none;" class="auto_complete" id="course_title_auto_complete">
</div>


<script type="text/javascript">
//<![CDATA[
var course_title_auto_completer = new Ajax.Autocompleter('course_title', 'course_title_auto_complete', "${createLink(controller:'courses', action:'auto_complete_for_course_title')}", {})
//]]>
</script>


Finally, Rails definitely has some more advanced scaffolding features that Grails didn't support out of the box or did not have a direct equivalent. Similarly to the example above, I just used the html that the scaffold generated, stuffed that into a separate template and used that.

Rails:

<%= render :active_scaffold => "notes", :constraints => {:user_id => current_user.id, :course_id => @course.id} %>


In Grails, this became a standalone template (_notes_scaffold.gsp), which initially contained the static HTML generated by Rails, which I then rigged to support dynamically generate the needed markup (e.g. loop, etc). In the end, the call to the scaffold code above, becomes the following:

<g:render template="/notes/notes_scaffold" model="[notes:UserNote.findAllByUserAndCourse(user?:current_user(),course)]" />


4. Helpers and Tags
In a couple of instances, the Rails app depended on the "helpers" - seemingly a collection o methods that are available to be executed either from the view or contoller. I ended up encapsulating some of these common operations into taglibs, so that the usage of the said tags in grails is as follows:

Rails (a sample Helper located in the Helpers project node):


require 'bluecloth'
module ApplicationHelper
include TagsHelper
def link_to_button(label)
"<table cellpadding=0 cellspacing=0 class=button_action_link><tr><td align=right style=\"background: url('/images/left_button_curve.gif') no-repeat; width: 8px; height: 23px;\"></td><td nowarp=\"nowrap\" style=\"background: url('/images/center_button_bg.gif') repeat;\"> #{label} </td><td style=\"background: url('/images/right_button_curve.gif') no-repeat; width: 29px; height: 23px;\"></td></tr></table>"
end
end


In Grails, it becomes the following:
class CosTagLib {

def linkToButton = { attrs ->
out << "<table cellpadding=0 cellspacing=0 class=button_action_link><tr><td align=right style=\"background: url('${createLinkTo(dir:"images",file:"left_button_curve.gif")}') no-repeat; width: 8px; height: 23px;\"></td><td nowarp=\"nowrap\" style=\"background: url('${createLinkTo(dir:"images",file:"center_button_bg.gif")}') repeat;\"> ${attrs.label} </td><td style=\"background: url('${createLinkTo(dir:"images",file:"right_button_curve.gif")}') no-repeat; width: 29px; height: 23px;\"></td></tr></table>"
}
}


An alternative to adding common helper functionality in tag libraries is to add the same methods as public methods on the superclass. For example, the parent controller contains the following closure:

def current_user = {
if (this.currentUser==null && session.user) {
this.currentUser = User.get(session.user.id)
}
println "Returning currentUser ${currentUser} "
return currentUser;
}


Then, in GSPs, one can use the closure as follows:


5. Conclusion

It's interesting that the migration of views/templates is probably the least complicated part of migrating a Rails app to Grails. Yet, at the same time, together w/ migrating the controllers it was possibly the most time consuming task. Understandably, these artifacts represent ARE the web application. While there probably isn't a good way to automatically convert the controller code, the view code is much more amenable to such an automated conversion, tag-for-tag.

For a lot of these repetitive tasks of converting the app UI tag by tag ( I didn't spend the time to create an auto-converter), I ended up creating a couple of NetBeans live templates that give me parameter and code completion of attributes, jumping between different params, etc.

Tuesday, May 05, 2009

Converting legacy Rails apps to Grails : The Controllers

So, you've already looked at the previous blog posts on Setting up the Project and Migrating the Domain Objects. The whole world must be wondering "What happened to this blog post series, did people just stop migrating from Rails to Grails?". Well, I've been in Tapestry land for the last 6-7 months and haven't had much free time to finish my blogging endeavor to finish my series of articles. But, what do you know : all of a sudden the topic of migrating legacy Rails apps to Grails came back to the fore for me (work related, don't ask, it's top secret), and here I am. In a valiant effort, I will try to finish off the topic in one fell swoop (hopefully today) and bang out a couple of different articles that document in details the ups and downs of such a migration.

Because this article is on the long side, here is the Table of Contents:

  1. Overview of Controllers

  2. General language related issues.

  3. Input Processing

  4. Input Validation and Error Reporting

  5. Rendering Responses

  6. Advanced Ajaxiness : Dynamic Javascript

  7. Conclusion


1. Overview of controllers


Now, back to the meat and potatoes of this article : migrating the Rails controllers to Grails. It's no secret that Grails heavily borrowed ideas from Rails (and NO, Grails is not Groovy on Rails, there's no mass transit involved at all, it's the good ole cup that everyone wants) and as can be seen from the screenshot of the project setup, both framework keep the controllers in the Controllers NetBeans project folder. Creating Grails controllers is easy: just right click on the Controllers project folder and select "New Controller". NetBeans walks you through naming the Controller properly and creates the needed file and run the regular Grails "create-controller" task, which in creates a default view for the controller.


The structure of the controllers themselves is very similar as well : in both cases, there is a one-to-one relationship between the Rails and Grails controllers. Inside the controller, in both cases, there is a class containing a bunch of closures , methods, and private member variables. In both cases, the closures in the controller become a part of the "public api" exposed by the controller, as all closures can be called from the URL (e.g. http://localhost:8080/app/controllerName/closure -> http://localhost:8080/app/account/login). Private methods are not accessible to be invoked from the URL. For "old school" Java developers who might not be intimately familiar w/ Rails or Grails, it is interesting to note that the controllers are thread safe : that is, they can contain instance variables that will not be clobbered if two concurrent requests are sent to the same controller. A new controller instance is created for each Http request.

OK, let's see what's inside the controller. Here's an example Rails controller:


class ActivityItemsController < ApplicationController
def create
@activity_item = ActivityItem.new(params[:activity_item])
if @activity_item.save
// do whatever
else
// do whatever else
end
end
end


Converting this same controller to Grails would look like this:

class ActivityItemsController extends ApplicationController {
def activity_item;

def create = {
this.activity_item = new ActivityItem(params.activity_item)
if (activity.save()) {
// do whatever
} else {
// do whatever else
}
}
}


2. General language related issues.

A lot of things to talk about here. First of all, just looking at the code it looks almost the same. The first superficial difference is the naming convention for the classes : in Rails user underscore_separated_file_names, whereas Groovy uses CamelCase. One notable difference is that in Grails, you do need to declare the class members, whereas in Rails (due to Ruby heritage), the properties can directly be assigned to when needed (e.g. @activity_item = ....). While the Ruby approach does save one line of code to declare the property, while migrating the code I found it very helpful to see the declarations at the top of the Groovy class. When you don't declare the class members upfront, it seems that it's quite easy to create a whole bunch of properties in the Ruby class w/o realizing how many you've created, which generally can lead to muddying the interface (mind you, the said properties are publicly accessible - e.g. from views, other closures, methods, etc).

3. Input processing
The second thing to note is the existence of the "params" map in both cases. In both cases, one can both read from and write to the params map using the accepted syntax : map[:key] in Ruby and map.key or map[key] in Groovy. So, nothing particularly interesting here. A bunch of other default objects are available in the Grails controller (probably quite familiar to Java Devs) such as servletContext, session, request, params, flash. Dealing with all is mostly the same in both frameworks and should be familiar to anyone done anything on the web.

When processing input, in a number of places, Rails uses the following shortcut/idiom to bulk update the values of many attributes of an object from request parameters at once:

class Foo

def bar
@activity.update_attributes(params[:activity])
end
end

To cut the long story short, this take in the value of request parameters and binds them to values in the object (note, this has severe security implications but that's a different topic to discuss). Grails offers an equivalent statement with:

class Foo {
def activity

def bar = {
bindData(activity,params.activity)
}

}

If using the straight out bindData method from Grails it accomplishes the same thing, with the same security implications. Whenever I actually bumped into examples like this, I tried to address some of the security issues by using the "more advanced" bindData method in Grails, which allows specifying parameters to exclude and a prefix of a property to use for binding, e.g. if I only wanted to bind the customer.name and customer.phone attributes from the request and I definitely wanted to prevent the customer.id attribute being affected, I'd use something like this:

bindData(myCustomerObject,params,["id"], "customer")


4. Input Validation and Error Reporting
In both framework, a large part of validating the input that is written to the domain model is done by specifying constraints in the domain model itself (e.g. see the article about the Rails->Grails domain migration). Thus, in both frameworks, code like this is pretty common:

if @activity.save
// do whatever on success
else
flash[:error]= @activity.errors.full_messages.join("
")
end


In Grails, the code looks very similar:

if (activity.save()) {
// do whatever on success
} else {
flash.error = activity.errors
}


One minor difference here is that (at least in this app), the Rails just concatenated the error messages as text and placed them in the "error" property in flash scope. In contrast, Grails assigns the actual "errors" object to the same flash property, then allowing the view to render these error objects as it wishes (e.g. using the g:renderErrors tag), which would allow rendering an error for a particular property, etc.

In both frameworks, validation of can happen in the controller itself, and errors can be added to the relevant error property (in the appropriate scope).

One more advanced feature of Grails that I found very useful later on in the conversion are the Grails are the form beans that you can use to populate values from the request (thus shielding from the security issues referred to further up), validating the input in a domain-class style approach, and generating errors in a nice and easy manner. So, here's the form object:


public class ChangePasswordForm {
String oldPassword;
String password;
String passwordConfirmation;

static constraints = {
oldPassword(nullable:false,blank:false)
password(nullable:false, blank:false, size:4..40)
passwordConfirmation(nullable:false, blank:false, size:4..40,
validator: { oldPw, chgPwdCmd ->
if (oldPw!=chgPwdCmd.password) {
return "notsame.message"
}
}
)
}
}


You'll note the declarative syntax familiar from domain object validation, it's a beauty !!!

<g:formRemote url="[action:'change_password']" name="ChangePasswordForm"
before="Element.show('form-indicator-pwd')"
onSuccess="Element.hide('form-indicator-pwd')">

</g:formRemote>


Add the following to your grails-app/i18n/messages.properties for custom error messages:

#Custom messages
forms.ChangePasswordForm.passwordConfirmation.notsame.message=Password confirmation not the same as password
wrong.password.message.forms.ChangePasswordForm.password=Old password is wrong, please enter again
forms.ChangePasswordForm.password.blank.message={0} cannot be blank


Finally, using the form in the controller when submitted:

def change_password = { ChangePasswordForm changePasswordForm ->
if (!changePasswordForm.hasErrors()) {
// accessing the values from the form
def pwdValue = changePasswordForm.password
// adding a custom error to the form for an error not enforced in constraints
if (whateverRandomReasonYouWantToRejectAField) {
changePasswordForm.errors.rejectValue("password","wrong.password.message")
}
// do whatever
} else {
// do whatever else
}
}
}


Finally, it seemed like a pretty common idiom in the Rails app to use dynamic javascript (I will talk about that plugin later ) to render errors back to the client:

if (@activity.save)
// do whatever on success
else
flash[:error] = "#{@activity.errors.full_messages.join('
')}"
render :update do |page|
page.replace_html "errors_div", :partial => "common/errors_flash",:layout=>false
// do whatever else to the page
end
end


In essense, this takes the validation errors, renders them using the "errors_flash" template, and replaces the content of the "errors_div" in the page with the rendering result. This approach caused me a lot of grief initially, but after a little bit of work it turned into the following in my Grails app:

if (activity_item.save()) {
// do whatever on success
} else {
js_error(activity_item.errors)
}


Where the js_error method in the controller superclass, looks something like this (using the dynamic javascript plugin that will be discussed later):

def js_error = { errors ->
flash.error = errors
log.debug "Sending errors back to client: ${errors}"
renderJavascript {
update 'errors_div', [text:g.render(template:"/common/errors_flash")]
callFunction "Element.show" , 'errors_div'
}
}


5. Rendering Responses
Converting the response rendering from Rails to Grails was pretty straightforward, here's the Rails example:

def new
render :partial => "new", :layout => false
end


In Grails, this becomes:

def _new = {
render(template:"new")
}


One tricky thing to note here is that because "new" is a Groovy keyword, I could not use the same closure name, NBD. The render controller method is pretty much the best thing since sliced bread and can render a whole bunch of things like regular pages, templates, XML, or JSON. Grails uses a convention that partial pages (templates) are named starting w/ an underscore. Thus, when you do:

render(template:"fooTemplate")

Grails finds the _footemplate.gsp file and renders it (equivalent to the Rails render :partial => "footemplate" which renders _footemplate.rhtml).


One other common idiom in the Rails app was to issue redirects from the controller:

redirect_to :action => 'show', :controller => 'activities', :id=> params[:act_id]


Grails supports this idiom pretty nicely with the redicect controller method with pretty much the same parameters:

redirect(controller:'activities', action:'show', id:params.act_id)


This particular project was using both script-centered and content-centered AJAX, and not much data-centered AJAX, so I didn't get to use JSON or XML rendering much; however, I always found the automatic marshalling to JSON or XML pretty cool:

// Automatic marshalling of XML and JSON
import grails.converters.*

render Book.list(params) as JSON
render Book.get(params.id) as XML


Finally, one cool feature of Rails that I initially missed was the ability to specify the default layout per controller :

class ActivitiesController < ApplicationController
layout "internal"
end

The statement above sets the default layout for this controller in the controller itself. Grails supports specifying the layout either by convention (e.g. grails-app/views/layouts/CONTROLLER.gsp or grails-app/views/layouts/CONTROLLER/ACTION.gsp , effectively equivalent to specifying layout="internal" in the controller) or explicitly in the template by specifying a meta tag (<meta name="layout" content="internal"></meta<) in the template.

6. Advanced Ajaxiness : Dynamic Javascript
I was planning to discuss Rails plugins in a separate article; however, there is one particular Grails plugin that was extremely useful to cover a portion of Rails that Grails doesn't cover out of the box. More specifically, I'm talking about the Rails script centered AJAX w/ dynamic javascript, e.g. :

render :update do |page|
page.replace_html "errors_div", :partial => "common/errors_flash",:layout=>false
page.replace_html "show_activities", :partial=>"show", :layout=>false
end


As explained before, this replaces the content of the "errors_div" in the page w/ the rendered "errors_flash" template (which basically renders the flash errors in a list or something like that), and then replaces the content of the "show_activities" div w/ the content of the partial template.

My initial approach was to change the actual pages to process the response and update the right div w/ the returned content, but it was a big PITA, considering how much the Rails app used this. Finally, after some searching on the net, I found the Dynamic Javascript plugin. It had most of the features I needed to implement this Rails idiom with something like this:


renderJavascript {
update 'errors_div', [text:g.render(template:"/common/errors_flash")]
callFunction "Element.show" , 'errors_div'
update 'show_activities', [text:g.render(template:"show_activities")]
}


Now, in places where I needed to update multiple elements on the page, I ended up using this style of code in the controller itself. However, the majority of the uses were the following:
* Render an error div
* Replace a content div w/ the content of a template
* A combination of the two.

As a result, I moved the following code into the parent class of my controllers:

def js_error = { errors ->
flash.error = errors
log.debug "Sending errors back to client: ${errors}"
renderJavascript {
update 'errors_div', [text:g.render(template:"/common/errors_flash")]
callFunction "Element.show" , 'errors_div'
}
}

def js_render = { replaceDiv,replaceContent ->
renderJavascript {
replace replaceDiv, [text:replaceContent]
}
}

def js_error_and_replace = { errors, replaceDiv,replaceContent ->
flash.error = errors
println "Found errors ${errors}"
renderJavascript {
update 'errors_div', [text:g.render(template:"/common/errors_flash")]
callFunction "Element.show" , 'errors_div'
replace replaceDiv, replaceContent
}
}


Which significantly simplified the code in the actual controllers, e.g. :

if (this.user.authenticate(user.login, changePasswordForm.password)) {
if (this.user.save()) {
flash.notice = "Password Changed"
js_render("change_password", g.render(template:"change_password_form"))
} else {
flash.notice = "Password could not be changed"
js_error(user.errors)
}
} else {
println "Didn't authenticate w/ password"
js_error_and_replace(changePasswordForm.errors,"change_password",[text:g.render(template:"change_password_form")])
}


As mentioned above (and as expected), Grails support redirects pretty nicely. However, Javascript redirects , though not necessarily tricky, still required an extra piece of code to the parent controller:

def js_redirect = { redirectUrl ->
def jsRedirect = "document.location = \'$redirectUrl\'"
renderJavascript {
appendJavascript jsRedirect;
}
}

At which point, the code in the controller is really straightforward:

js_redirect(createLink(controller:'activities', action:'show',id:params.id))


However, one of the use cases involved a form executing in a frame (an upload form that did some status updates in a frame), which depending on the content returned in the frame, needed to redirect the whole browser window whenever the upload was done. In Rails it was handled as such:

responds_to_parent do
render :update do |page|
flash[:notice] = "File Uploaded Sucessfully"
page.redirect_to :action =>'show', :controller=>'activities', :id=>params[:activity_id]
end
end


The code in the parent controller to support this idiom is as follows:

def parent_redirect = { redirectUrl ->
render (text : "<html><body>"+
"<script type='text/javascript' charset='utf-8'>"+
"var loc = document.location;"+
"with(window.parent) {"+
" setTimeout(function() { "+
"window.eval(document.location = \'$redirectUrl\'); loc.replace('about:blank'); "+
"}, 1)"+
"}"+
"</script></body></html>")
}


One final note on the Dynamic Javascript plugin : the plugin that is uploaded on the Grails wiki is version 0.1 . The plugin appears to not be maintained actively; however, the linked author's blog (http://blog.peelmeagrape.net/2007/10/9/dynamic-javascript-plugin-for-grails) has version 0.2 of the plugin. Still, when I was heavily using this plugin, I ran into some issues with it and had to patch it as follows (in plugins/dynamic-javascript-0.2/src/groovy/JavascriptBuilder.groovy , commented out code is the broken part):

private String renderTemplate(Map options)
{
// StringWriter s = new StringWriter()
// GrailsWebRequest webRequest = (GrailsWebRequest)RequestContextHolder.currentRequestAttributes();
// HttpServletResponse response = webRequest.getCurrentResponse();
// def writer = (RoutablePrintWriter)webRequest.getOut()
return controller.g.render(options);
// writer.destination.out.toString();
}


I posted on the author's blog w/ the proposed change, and later on received a notification that he liked the change and that he would incorporate it into the plugin. However, it appears that the plugin on his page is still at version 0.2 and my comment has disappeared from the blog. Oh, well...


Conclusion
It was quite a journey so far. None of the problems in migrating controllers are particularly difficult or mind bending; however, there are just a lot of different issues to deal with if you're starting from scratch. So, now that you have all this good info, START MIGRATING THAT RAILS APP THAT YOU'VE BEEN EYEING, WOULD YA !!???!!!